
~~~~~~~~~~~~~~~~~~~~~~~~~~~~~~~~~~~~~~~~~~~
Live Earth Farm (Com)Post
5th Harvest Week, Season 12
April 30th - May 6th, 2007
~~~~~~~~~~~~~~~~~~~~~~~~~~~~~~~~~~~~~~~~~~~
(click here for a pdf of the paper
version of this newsletter)
In this issue
--Greetings from Farmer Tom
--Crop Notes
--Egg shares start this week!
--How to donate your share
--An important heads-up about beets
--Outstanding in the Field Dinner!!
--Pictures around the farm
--What's in the box this week
--Notes from Debbie's Kitchen
--Calendar
" Even if I knew that tomorrow the world would go
to pieces, I would still plant my apple tree. "
~ Martin Luther
Greetings from Farmer Tom
~~~~~~~~~~~~~~~~~~~~~~~~~~~~~~~~~~~~~~~~~~~~~~~~
 Planting is one of the most fundamental activities that makes us fully human.
Planting reflects our ability to have faith, faith in the awesome power of nature
that helps sustain us on this planet. Last week during one of our school visits
I sat with 20 children on a freshly plowed field; we dug our hands into the soil,
planting tomato seedlings and seed potatoes, while all the time discovering that
the soil we were planting into was not just a bunch of 'dirt,' but rich in odors
and colors, alive with visible creatures such as earthworms, roly-pollies, spiders,
and ants. A freshly dug and still open gopher hole was a wonderful opportunity
to explore the soils 'underworld.' I stuck my arm elbow deep down the tunnel
and pulled out a fistful of rich, smooth, moist soil with a thick, juicy earthworm
wriggling in it. Suddenly, many of the first graders were not afraid of sticking
their whole arm down into the soil, as if in search of some kind of treasure.
In my farmer's mind they had already found the treasure.
Planting is one of the most fundamental activities that makes us fully human.
Planting reflects our ability to have faith, faith in the awesome power of nature
that helps sustain us on this planet. Last week during one of our school visits
I sat with 20 children on a freshly plowed field; we dug our hands into the soil,
planting tomato seedlings and seed potatoes, while all the time discovering that
the soil we were planting into was not just a bunch of 'dirt,' but rich in odors
and colors, alive with visible creatures such as earthworms, roly-pollies, spiders,
and ants. A freshly dug and still open gopher hole was a wonderful opportunity
to explore the soils 'underworld.' I stuck my arm elbow deep down the tunnel
and pulled out a fistful of rich, smooth, moist soil with a thick, juicy earthworm
wriggling in it. Suddenly, many of the first graders were not afraid of sticking
their whole arm down into the soil, as if in search of some kind of treasure.
In my farmer's mind they had already found the treasure.
Now that the danger of frost is officially over (April 15th) we planted our main
pepper crop – more than 10,000 plants of 6 different varieties. My favorites
are the thick skinned pimento peppers and the popular elongated 'Corno de Toro.’ We
also planted some bell peppers, some 'Chile Poblanos' which are great for stuffing,
and a bunch of different hot peppers such as Serranos and the Hungarian Hot Wax.
Right next to the peppers, a block of over 4,000 Armenian cucumber seedlings
got planted single row as well as a large block of Genovese basil. Now with tomatoes
(the cherry tomatoes are starting to bloom!), Peppers, Cucumbers and Basil planted,
it is deceiving to think that soon we'll be enjoying the bounty of summer. We
must have a little patience. Plants are wonderfully rewarding in that you can
witness their progress almost daily (especially in Spring), but like with any
living organism everything has a season, and so we must wait for these plants
to mature and render their wonderful gifts.
Crop Notes
~~~~~~~~~~~~~~~~~~~~~~~~~~~~~~~~~~~~~~~~~~~~~~~~
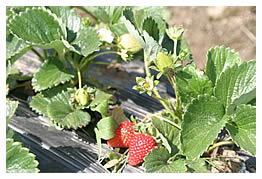 The “Extra Fruit” option starts this week, however the strawberries
are still just one or two weeks shy of reaching the kind of harvest quantities
we would typically have at this time of year. And it is not just us. Most strawberry
growers around here agree that this small delay has to do with the cold February
and March weather pattern we had. The plants are really lush though and loaded
with flowers and fruit... however most of them are still immature and green.
So this week the Extra Fruit shareholders will only get 2 baskets, but they can
expect 3 to 4 baskets in a week or two, which will continue until our other fruit,
such as the Olallieberries (blackberries), start maturing around the end of May.
Then the “Strawberry Bounty” shareholders will start receiving their
allotment at that time.
The “Extra Fruit” option starts this week, however the strawberries
are still just one or two weeks shy of reaching the kind of harvest quantities
we would typically have at this time of year. And it is not just us. Most strawberry
growers around here agree that this small delay has to do with the cold February
and March weather pattern we had. The plants are really lush though and loaded
with flowers and fruit... however most of them are still immature and green.
So this week the Extra Fruit shareholders will only get 2 baskets, but they can
expect 3 to 4 baskets in a week or two, which will continue until our other fruit,
such as the Olallieberries (blackberries), start maturing around the end of May.
Then the “Strawberry Bounty” shareholders will start receiving their
allotment at that time.
No more Rutabagas until Winter! Many of you must be thinking: "It’s
about time and good riddance, I don't want to see those gnarly small roots anymore!" I
apologize; I should have stopped putting them in your share sooner (I put the
last of them unannounced into everyone’s share a week or two ago, because
we had them, but I was unaware how tough and fibrous they had become). So if
you still have them in your fridge, feel free to compost them, or as Debbie suggests,
use them to make soup stock, but don’t feel guilty about not eating them.
I don’t want anyone to be turned off by rutabagas; they are a wonderful
tasty root... it’s just that in our case it was my fault to have harvested
them past their prime, when many of the plants had already started to bolt. I
hope to correct this oversight toward the end of November when they will be back
in season again. (They’ll appear in the winter shares, but not again in
the regular shares.)
Last year we grew a small patch of what is commonly known as a huskcherry. It
looks like a tomatillo, however the fruit inside the husk is yellow and sweet
and can be eaten fresh. It is native to the Andes and in Ecuador, and is called
Uvilla or small grape. In this country, I have seen them in health food stores
sold sundried as "Inca Berries.” Last week we transplanted over 1,000
plants in the greenhouse, and hope to have them planted out in the field by end
of May. They are very prolific, and we can expect to harvest them sometime in
August.
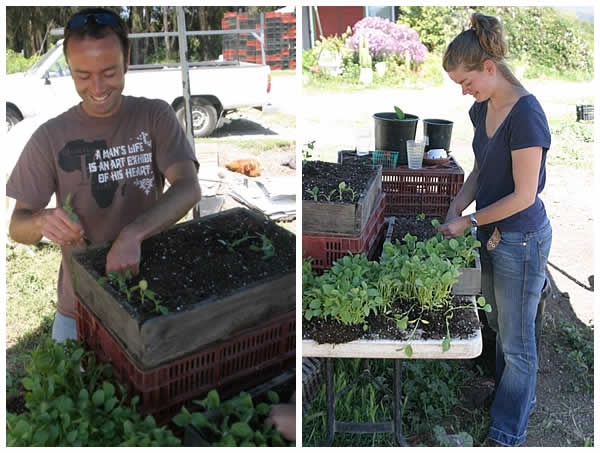
Bernadette (right) and friend transplanting huskcherries.
<back to top>
Egg share starts this week!
~~~~~~~~~~~~~~~~~~~~~~~~~~~~~~~~~~~~~~~~~~~~~~~~
The long-awaited egg shares are finally here! Although I know I sound like a
broken record, please, everyone who is getting eggs: remember that ALL egg shares
are in HALF-dozen increments. So next to your name on the checklist it will tell
you how many HALF-dozens to take. The eggs will be in a styrofoam cooler at your
pick-up site.
How to donate your share
~~~~~~~~~~~~~~~~~~~~~~~~~~~~~~~~~~~~~~~~~~~~~~~~
If you ever know you’re going to be away and unable to pick up your share
(and don’t have anyone to give it to), if you contact Debbie at the farm
a day or two ahead of time, she can arrange for your share to be donated to a
needy family. We have a list of eager recipients, plus a few church pantries
that welcome the extra fresh produce.
An important heads-up about beets
~~~~~~~~~~~~~~~~~~~~~~~~~~~~~~~~~~~~~~~~~~~~~~~~
So that no one else is unnecessarily alarmed by this [we got a few emails last
week], we need to alert everyone – especially anyone who’ve never
eaten beets before – about this: beets color more than your fingers and
clothes. The pigment in beets is actually so intense that it survives the gauntlet
of your digestive system and will color your urine and feces, in direct proportion
to how many beets you have eaten! Although completely harmless, it can be quite
disconcerting to see magenta urine in the toilet bowl! But now you are all armed
with the truth, so hopefully no one else will make an unnecessary trip to the
doctor’s office.
Outstanding in the Field Dinner!!
~~~~~~~~~~~~~~~~~~~~~~~~~~~~~~~~~~~~~~~~~~~~~~~~
The rumors are true ... Outstanding in the Field (OitF) returns to Live Earth
Farm on Saturday, June 9! Jim Denevan – the OitF founder who conceived
the magical idea of taking diners literally out to the farm while he was executive
chef at Gabriela Cafe – will create the menu for this five-course meal
celebrating springtime's harvest.
Reservation links should be up on the OitF website by May 1, so check in then
at www.outstandinginthefield.com to grab your seats. Hope to see you at the table!
<back to top>
Pictures around the farm
~~~~~~~~~~~~~~~~~~~~~~~~~~~~~~~~~~~~~~~~~~~~~~~~
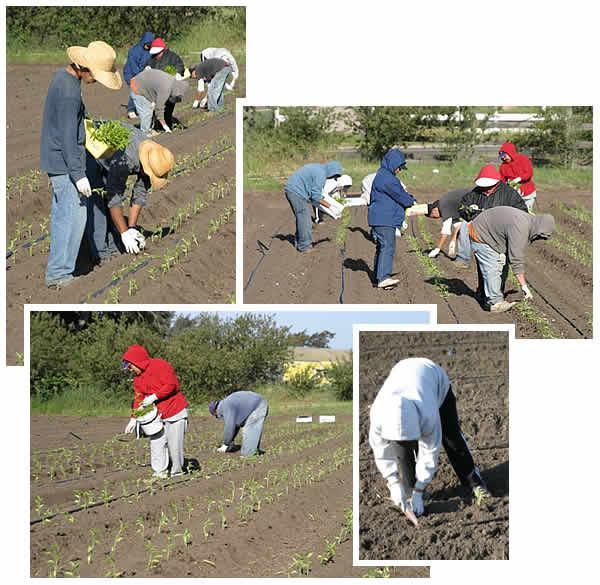
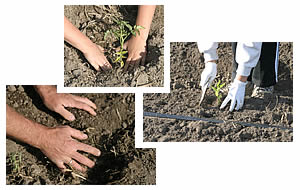
The beds are already formed, the drip tape in place; some workers walk
down the rows, laying the pepper seedlings out, and the ones that follow
behind dig holes and plant them.
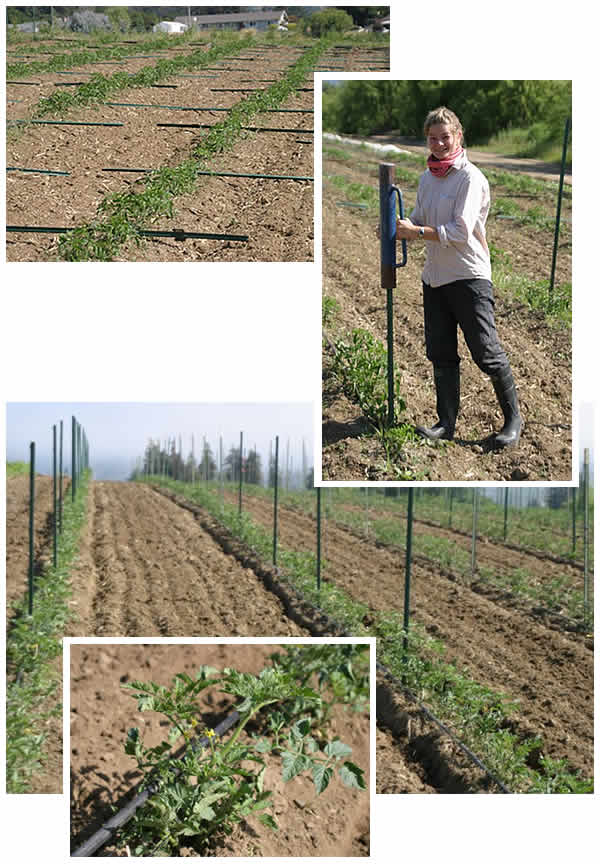
Staking the tomato plants entails laying out all the metal stakes, then
pounding each of them in with a stake pounder (what Bernadette is doing). As
the tomatoes get bigger, twine is run between the stakes to support the
plants in a neat row. Bottom photo in this group shows blossoms already
on our cherry tomatoes!
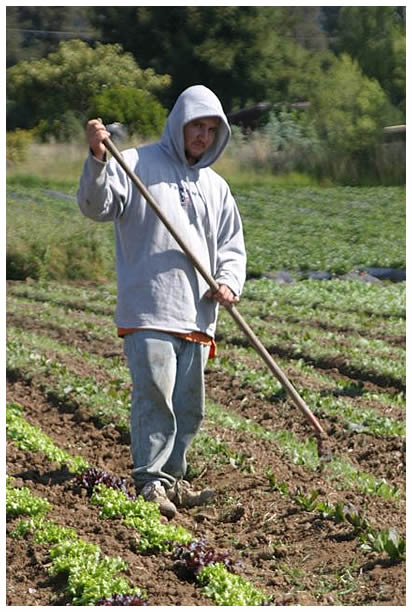
Jonathan weeding the young radicchio plants.
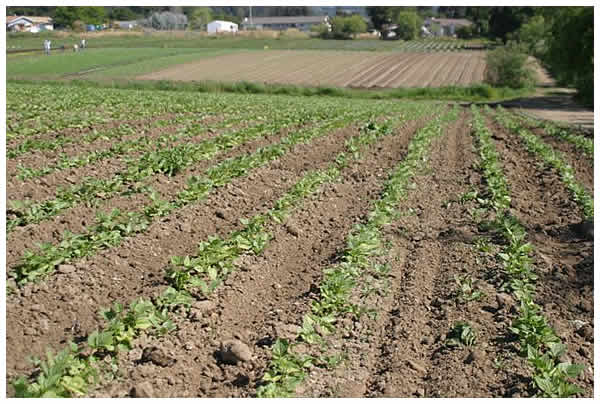
A field of young green bean plants (foreground).
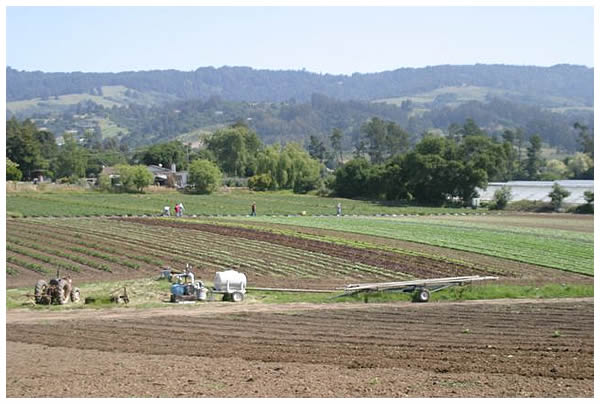
A pastoral farm setting!
<back to top>
What's in the box this week
~~~~~~~~~~~~~~~~~~~~~~~~~~~~~~~~~~~~~~~~~~~~~~~~
(Content differences between Family and Small
Shares are underlined and italicized; items with a “+” in
Family Shares are more in quantity than in Small; anticipated quantities are
in parentheses. Sometimes the content of your share will differ from what's on
this list, but we do our best to give you an accurate projection. It's Mother
Nature that throws us the occasional curve ball!)
Family Share:
Arugula (bagged)
Red beets
Carrots
Chard
Fava beans +
Garlic +
Lettuce +
Mei quing choi
Onions +
French breakfast radishes
Spinach (Lakeside)
Strawberries (1 bskt)
Small Share:
Arugula (bagged)
Broccoli (Lakeside)
Carrots
Chard
Fava beans
Garlic
Lettuce
Onions
French breakfast radishes
Strawberries (1 bskt)
Extra Fruit Option:
2 baskets of strawberies (see Tom's crop notes, above)
Notes from Debbie's Kitchen
~~~~~~~~~~~~~~~~~~~~~~~~~~~~~~~~~~~~~~~~~~~~~~~~
A few new members are starting this week
-- welcome! And always remember, there are many many more recipe ideas
(and photos of the veggies) in the recipe
database on our website. Here
are just a few ideas to help you along with what's in your box this week! – Debbie
French Breakfast Radishes and their greens
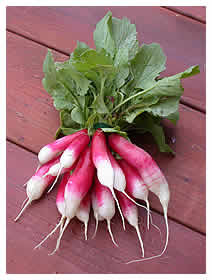 These are beautiful elongated pink radishes with white tips. Radish greens are
edible (I only just learned this myself not too long ago), so if the ones attached
to your radishes look fresh and good, feel free to cook with them! I don’t
think I’d eat them raw, as they have a fuzziness to them, but steamed or
sautéed like you might other greens would be fine (the fuzziness disappears
with cooking). On the other hand, feel free to compost them and just eat the
radishes. It is optional; I don’t want anyone stressing because they feel
guilty about not eating their radish greens! I just want the people who run out
of greens before the week is up to know that they can eat their radish greens
too!
These are beautiful elongated pink radishes with white tips. Radish greens are
edible (I only just learned this myself not too long ago), so if the ones attached
to your radishes look fresh and good, feel free to cook with them! I don’t
think I’d eat them raw, as they have a fuzziness to them, but steamed or
sautéed like you might other greens would be fine (the fuzziness disappears
with cooking). On the other hand, feel free to compost them and just eat the
radishes. It is optional; I don’t want anyone stressing because they feel
guilty about not eating their radish greens! I just want the people who run out
of greens before the week is up to know that they can eat their radish greens
too!
The radishes are great for just eating! Put a few in a dish at the table at lunch
or dinnertime and pass the salt. Pack them into your kid’s lunches along
with the carrots.
Another very French way to eat them (at breakfast, no less!) is to spread a little
sweet cream butter on them [always use organic butter – I like Straus Organic
Creamery butter] and sprinkle with just a touch of sea salt. Delicious!
Try Bok choi or Mei Quing choi in tuna salad!
I made the most fabulous tuna salad the other day; instead of the usual diced
celery and mayonnaise, I took a couple stalks of the Mei Quing choi, diced the
stems and finely shredded the leaves and added them all to the tuna instead.
The texture is really nice! The choi is more tender than celery, so it is succulent-crunchy!
You could just make that substitution (choi for celery) and be done with it and
it would be fine, but I had to go a little further: I used tuna in olive oil,
drained, added a splash of soy sauce and a squeeze of fresh lemon, then went
out into my newly-planted herb garden and snipped some chives and dill, minced
them finely, and added them to the mix, with just a little mayo to blend everything
together. Yummo!
Monster Greens
by member Mary Lyn Azar
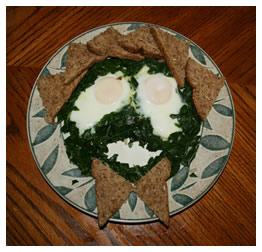 I wanted to try getting more vegetables into meals other than dinner and keep
it kid friendly enough for my 3 and 5 year olds to eat them. So this morning
I blanched some chard then sautéed it for about a minute with garlic and
butter (I do this as a side at dinner). This time, I spread the greens over the
bottom of the omelet pan and made two wells in the greens. I cracked an egg into
each well for "eyes," put on the lid and cooked until the eggs were
cooked through. While the eggs were cooking, I buttered toast and cut it into
triangles. Slid the greens and eggs onto a plate and moved them around a little
so I had a round face of greens, 2 egg eyes, and a hole in the greens for the
mouth. The toast triangles we "hair" or "spikes" and a bowtie.
The kids figured out it was a monster right away, and were enthusiastic about
helping me "eat the monster." We made breakfast sandwiches by heaping
greens and half an egg on each toast triangle and topping it with another. Yum!
I wanted to try getting more vegetables into meals other than dinner and keep
it kid friendly enough for my 3 and 5 year olds to eat them. So this morning
I blanched some chard then sautéed it for about a minute with garlic and
butter (I do this as a side at dinner). This time, I spread the greens over the
bottom of the omelet pan and made two wells in the greens. I cracked an egg into
each well for "eyes," put on the lid and cooked until the eggs were
cooked through. While the eggs were cooking, I buttered toast and cut it into
triangles. Slid the greens and eggs onto a plate and moved them around a little
so I had a round face of greens, 2 egg eyes, and a hole in the greens for the
mouth. The toast triangles we "hair" or "spikes" and a bowtie.
The kids figured out it was a monster right away, and were enthusiastic about
helping me "eat the monster." We made breakfast sandwiches by heaping
greens and half an egg on each toast triangle and topping it with another. Yum!
Beet suggestion
Sometimes I just roast all my beets at once, then keep them whole in the refrigerator
so that I can easily use them during the week. It is the roasting or steaming
that takes time (when I get home from the farm and it is 7 or 8pm, I don’t
want to spend another hour roasting beets), but if that part is done already,
then it is breathtakingly simple to pull a few out, peel them (cut off tops and
tails, and the skin just slips off easily), then slice or dice them an serve
them warm with a little butter, or cold with a vinaigrette or other dressing
(see next recipe).
Beets-yogurt-dill
This recipe is already in the recipe database, but I just had to repeat it for
new folks because it is just so delicious, beautiful and screamin’ easy!
Simply dice up cold cooked beets, then stir in some plain yogurt, minced fresh
dill and a little salt. It comes out a most brilliant shocking magenta, but the
dill... oh, it is so good!! Serve it in a little bowl, or put a spoonful on a
leaf or two of lettuce for a salad.
Fettuccini with Arugula and Goat Cheese, Arrivederci Style
submitted by member Nancy Trissel, who says, “Quick and delicious! Originally
appeared in my old home-town's local newspaper; recipe from an Italian transplanted
to the US. The article spoke of him growing and canning his tomatoes from
plants he grew in pots as that was all the gardening room he had.” Nancy’s
comments are in parentheses.
1 lb. dry fettuccini pasta (I used orecchiete as that is what I had on
hand)
4 tbsp. finely chopped onions
3 cloves garlic, minced
2 C diced roma tomatoes [or diced canned organic; your own if possible!]
3 tbsp. extra-virgin olive oil
1/2 C white wine
4 C of your favorite tomato sauce
1 C heavy whipping cream
salt and freshly ground pepper to taste
1 cup tightly packed fresh arugula, stems removed (this would work with BABY
spinach as well; adult spinach would be too tough)
4 oz. soft goat cheese
fresh grated high quality Parmigiano cheese to taste
In a large pot, cook pasta according to package directions until al dente. Drain
and set aside. In a large skillet, sauté onions, garlic, and tomatoes
in olive oil until onions are translucent and tomatoes are soft. Deglaze with
white wine. Add tomato sauce and cream and reduce until sauce is thickened. Season
with salt and pepper. Add pasta and arugula and toss to mix and slightly
wilt arugula. Transfer to individual pasta bowls and top with crumbled goat cheese
and Parmigiano. Serve immediately.
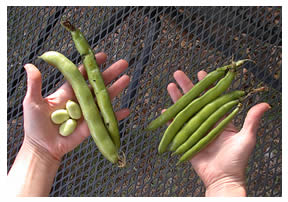
Fava Beans: a visual comparison of
mature pods/beans (at left, below) with the smaller pods (which can be cooked
and eaten pod and all - see last
week's newsletter for discussion on this)
Fava Bean and Orzo Salad with Arugula
from “Your Organic Kitchen” by Jesse
Ziff Cool
serves 4
4 oz. orzo or other small pasta
2 lbs. whole fava beans [figure your whole bagful]
3 tbsp. extra virgin olive oil
1 red onion, thinly sliced [the red onion is for color, and nice if you have
it, but I wouldn’t hesitate to use the onions you get in your box]
2 garlic cloves, minced [if you use some green garlic, keep in mind that it is
milder than typical cloves, so use a little more!]
1 ½ tbsp. chopped fresh marjoram
3 tbsp. chopped oil-packed sun-dried tomatoes
3 tbsp. red wine vinegar
Juice of 1 lemon
½ tsp. salt
½ tsp. freshly ground black pepper
1 bunch arugula (about 5 oz.) [or a farm bag-full]
Cook the orzo according to package directions; drain.
Meanwhile, bring a large pot of water to boil over high heat. Working in batches
if necessary, boil the beans for 6 minutes, or until the inner beans are tender
but not mushy. Cool slightly. Remove and discard the outer pods. Using a small
sharp knife, remove the outer skins of the beans. [I’ve never cooked favas
in their pods before shelling like Jesse describes; I usually shell them first.
This not only eliminates the need for a huge pot to accommodate the big pods
AND having to cooking them in batches, but also the beans cook quicker! In just
a minute or two. My suggestion: remove pods first, then cook all beans in boiling
salted water 1 to 2 minutes; remove with a slotted spoon or drain in a colander,
then peel by pinching one end of the skin and squirting out the bright green
bean inside. Have your kids help you with this; it’s a bit time consuming,
but fun, and be careful you don’t eat all the beans before you make the
salad! They’re tempting to snack on with a little salt!]
Heat the oil in a large skillet over medium heat. Add the onion and garlic and
cook for 7 minutes, or until very soft. Remove from the heat and stir in the
marjoram, tomatoes, vinegar, lemon juice, salt and pepper. Add the beans and
orzo and toss to coat well.
Divide the arugula among 4 salad plates. Top with the bean salad.
<back to top>
Calendar of Events
~~~~~~~~~~~~~~~~~~~~~~~~~~~~~~~~~~~~~~~~~~~~~~~~
(see calendar on website for more info)
<> Fri. May 18, Four Fridays Mataganza Garden Internship (5/18, 5/25, 6/1,
6/8)
<>
Sat. Jun 9 Outstanding in the Field Dinner
<> Sat. Jun 23 Summer Solstice
Celebration
<> July 10-14 Teen Adventure Camp
<> Aug 24-26 Childrens Mini-Camp
<>
Sat. Oct 20 Fall Harvest Celebration
<back to top>
Contact Information
~~~~~~~~~~~~~~~~~~~~~~~~~~~
email the farm: farmers@cruzio.com
email Debbie with newsletter input or recipes: deb@writerguy.com
phone: 831.763.2448
web: http://www.liveearthfarm.net
~~~~~~~~~~~~~~~~~~~~~~~~~~~