
~~~~~~~~~~~~~~~~~~~~~~~~~~~~~~~~~~~~~~~~~~~
Live Earth Farm (Com)Post
4th Harvest Week, Season 12
April 23rd - 29th, 2007
~~~~~~~~~~~~~~~~~~~~~~~~~~~~~~~~~~~~~~~~~~~
(click here for a pdf of the paper
version of this newsletter)
In this issue
--Greetings from Farmer Tom
--Morris Grassfed Beef
--Pictures of water usage on the farm
--More pictures from around the farm
--What's in the box this week
--Notes from Debbie's Kitchen
--Calendar
" When the well is dry we know the value of water."
~ Benjamin Franklin
Greetings from Farmer Tom
~~~~~~~~~~~~~~~~~~~~~~~~~~~~~~~~~~~~~~~~~~~~~~~~
When our well pump stopped working and our leaky and aging water tank had to
be replaced a few weeks ago, the only available water was from a field tank on
top of the hill which fed the rest of the farm by gravity flow. Nothing was more
important than to get the water back on; suddenly one's survival instinct is
on alert realizing there is no substance more crucial to survival than water.
Just like humans can’t survive for more than three days without water,
the same is true for most of the crops we grow. Although we trust that water
is available when we want it, we can't take it for granted. The fertility and
abundance of our crops is directly linked to the availability of water.
Last week I received an e-mail inquiring whether the lack of rainfall this year
will affect the productivity of the farm. It remains to be seen; most of our
water comes from the same aquifer everyone else gets their water from, so even
though the supply is plentiful at the moment, it may not always remain that way
in the long term. More than 80% of our water for the farm comes from groundwater.
The rest comes from rainwater collected in a pond. Last year alone we used approximately
50 acre-feet of water. That's a lot of water! Imagine a football field (an acre
is a little less than a football field) covered by 1 foot of water 50 times.
If one acre-foot is 326,000 gallons, we used over 16 million gallons of
water. The amount of water we use in our homes, large though it may appear to
be, is only a fraction of water used to produce our food and fiber. It is estimated
that in the United States, an average of 1,000 gallons of water are needed to
produce each pound of food we consume.
Here at the farm, as in most farms in the Pajaro Valley, the water is pumped
from wells, some as deep as 600 feet. The rate of water flow from our most productive
well is as high as 300 gallons per minute, which allows us to irrigate 3 to 4
acres at a time. But here at our home ranch, where the flow rate is only 25 gallons
per minute, we first have to store the water in holding tanks and than pump it
through a network of pipes and hoses to the plants in the field. Cool weather
crops such as broccoli, cauliflower, lettuce, and most leafy greens like to be
irrigated with above ground moveable aluminum pipe sprinklers, while other crops
such as strawberries, tomatoes, peppers, squash, cucumbers, and eggplants we
drip irrigate. Sometimes we don't irrigate at all, which is the case with our
dry-farmed tomatoes, and this year for the first time most of our potatoes are
being dry-farmed. Irrigation is a big job; imagine constantly assessing the thirst
of the more than 50 crops we grow throughout the season.

This weekend's half inch of rain that fell on the farm can be translated into
more than a half million gallons of free water, spread evenly over our 45 acres
of cultivated soil... which means we don't have to irrigate the next 4 to 5 days.
I consider that a wonderful blessing, even if it may cause a little bit of rot
on our strawberries. We can live with that. – Tom
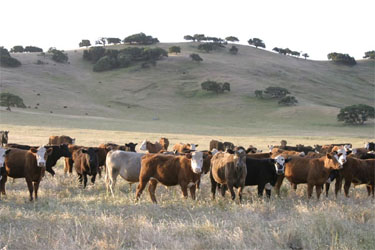
Morris Grassfed Beef
~~~~~~~~~~~~~~~~~~~~~~~~~~~~~~~~~~~~~~~~~~~~~~~~
Hi folks, it’s Debbie – If you are an omnivore in search of
a source of healthy, grassfed, grass-finished beef for your family, search
no further. Joe and Julie Morris, of T&O Cattle Company down in San
Juan Bautista are your answer. I have gotten my own beef from them for
several years now (so have many other CSA members) and can attest to the
quality of the meat and the integrity of the Morrises, who raise the animals
and steward the land. As Julie will tell you, “Our cattle enjoy a
completely organic diet of fresh grass, forbs and legumes, clean water,
and better views than most of us do! We use neither synthetic hormones
nor fed antibiotics: our animals grow only as fast as their genetics and
the range will allow. Their range, of course, serves also as watersheds
and habitat for us as well as other biological communities. We manage our
animals so that they enhance the diversity of life on the range, as well
as the quality of the water that falls on the range and flows to the towns
and sea. We believe this web of relationships we are stewarding is an integral
whole, depending for its health upon all its members: damaging the health
of any member of the "whole" community, therefore, damages the
rest. Our desire is to produce health with all we do. Only when this is
done are we satisfied that Morris Grassfed Beef is all it can be—the
best there is for all of us.” Also, all their Morris Grassfed beef
cattle are born and raised by them on their ranch in San Juan Bautista;
they do not purchase calves and then just finish them on grass. The animals
are under Joe and Julie’s care from birth to the time the meat is
delivered to you.
Here are a few factoids about eating meat from pastured animals, as gleaned
from Michael Pollan’s book, “The Omnivore’s Dilemma”: • A
growing body of scientific research suggests that many of the health problems
associated with eating beef are really problems with corn-fed beef. Cattle
are ruminants, not designed to eat grain (organic or not). It makes them
sick. This is why most of the antibiotics sold in America today end up
in animal feed. The research further indicates that pasture substantially
changes the nutritional profile of chicken, eggs, beef and milk. • The
large quantities of beta-carotene, vitamin E, and folic acid present in
green grass find their way into the flesh of the animals that eat that
grass. • The fats created in the flesh of grass eaters are the best
kind for us to eat. Grass-fed meat, milk, and eggs contain less total fat
and less saturated fats than the same foods from grain-fed animals. Pastured
animals also contain conjugated linoleic acid (CLA), a fatty acid that
some recent studies indicate may help reduce weight and prevent cancer,
and which is absent from feedlot animals. But perhaps most important, meat,
eggs, and milk from pastured animals also contain higher levels of omega
3s, essential fatty acids created in the cells of green plants and algae
that play an indispensable role in human health, and especially in the
growth and health of neurons – brain cells.
In a nutshell, the species of animal you eat may matter less than what
the animal you’re eating has itself eaten!
Joe is offering a CSA-style beef share this year, i.e. you can sign up
for a ‘split half’ (a quarter of a steer; about enough for
a family of 4 for a year) but then take delivery of your meat quarterly,
instead of all at one time. That way, it doesn't take up as much room in
your freezer!
If you are interested, go to www.morrisgrassfed.com to
learn more and to sign up. You
won’t be disappointed. - Debbie
<back to top>
Pictures of Water Usage on the farm
~~~~~~~~~~~~~~~~~~~~~~~~~~~~~~~~~~~~~~~~~~~~~~~~
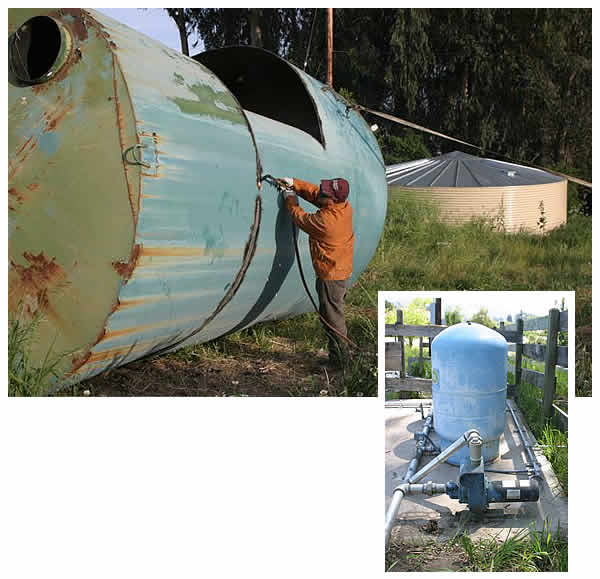
Above, our old water storage tank is being cut up to be hauled away for
scrap. The new storage tank taking its place is in the background. At right,
above, is the pressure
tank, which regulates the water pressure coming from the storage tank into
the lines (with pump itelf in foreground).
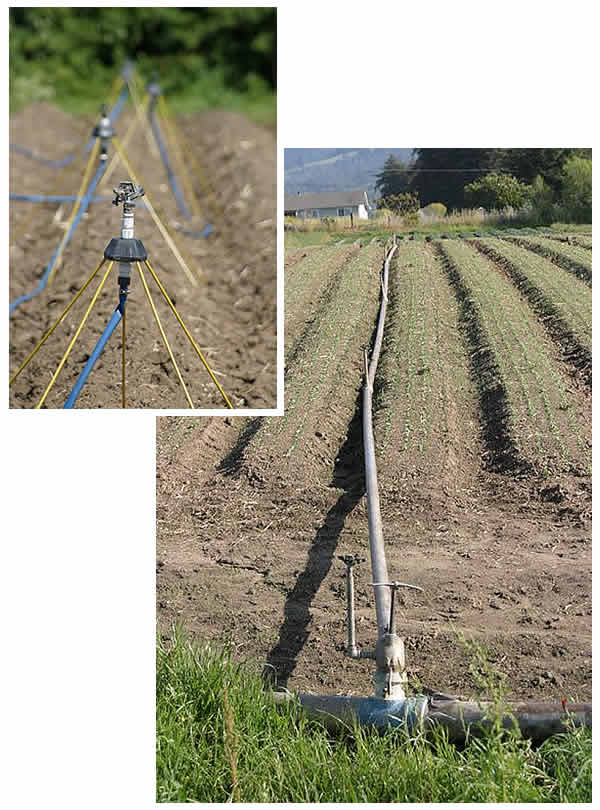
Here are two different versions of our above ground irrigation systems.
The big metal pipes are actually remarkably portable; although they look
like big versions of galvenized household plumbing, they are actually lightweight
aluminum pipes, easy to disassemble, reposition in a new field and reassemble.
Above ground sprinklers are used on our cool weather crops and leafy greens.
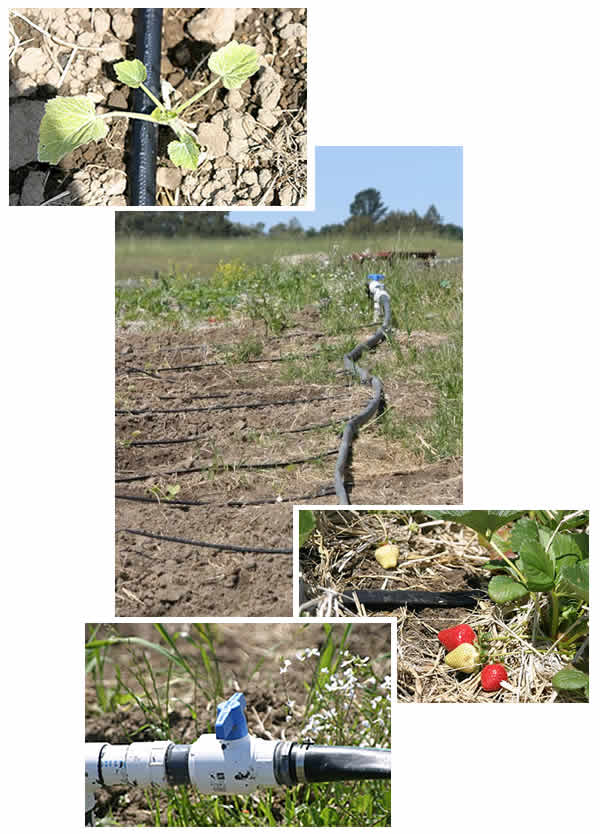
Here's the drip tape system. A valve connects to larger lightweight tubing
which runs along the edge of a field, then smaller perforated 'tape'
is laid out along the planting beds. At the end of the season, the tape
is collected (by us) and recycled by the manufacturer (they come and pick
it up)! We have last season's intern, Amy Kaplan, to thank for persevering
on plastic recycling issues here on the farm – thanks Amy!
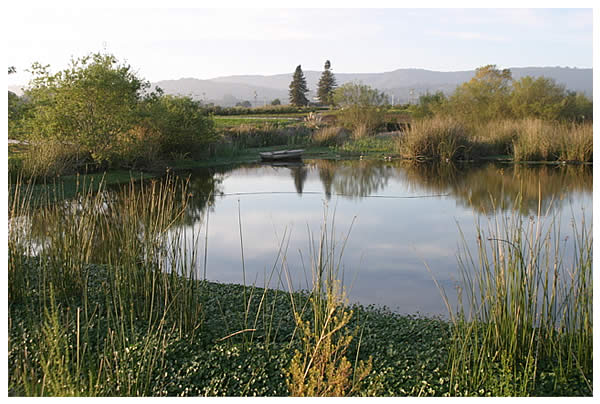
Lastly, this is the pond in the middle of the Pioneer Road property
we lease. It sources all our irrigation water for that piece of land,
as well as provides habitat for a number of ducks, frogs, and other
species. The windmill Tom purchased last year (see winter
newsletter, week 5) keeps the pond aerated to prevent stagnation
(and the accompanying mosquitoes and pond scum). [Correction 4/25/07:
My mistake – Tom says the pond is only used for irrigating certain
veggies; there is also a well on the property used for everything else.
- Debbie]
<back to top>
More pictures from around the farm
~~~~~~~~~~~~~~~~~~~~~~~~~~~~~~~~~~~~~~~~~~~~~~~~
First, some pictures of what's coming in our shares...
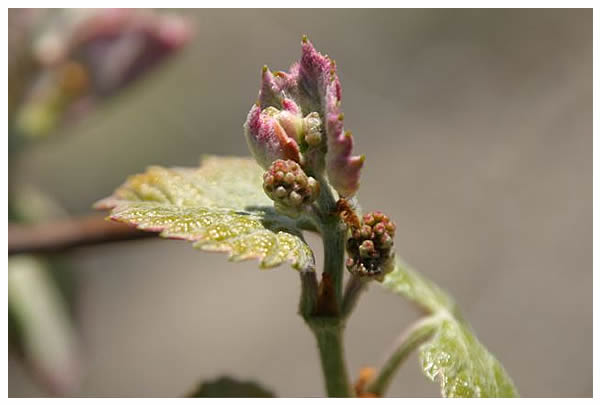
The very beginnings of some concord grape clusters!
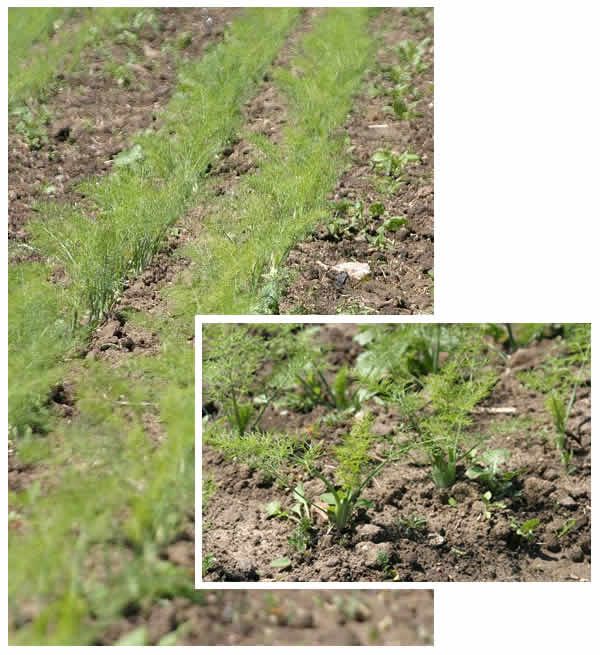
A field of young fennel plants...

and some up and coming Napa (Chinese) cabbage.
We can't finish without a little wildlife...
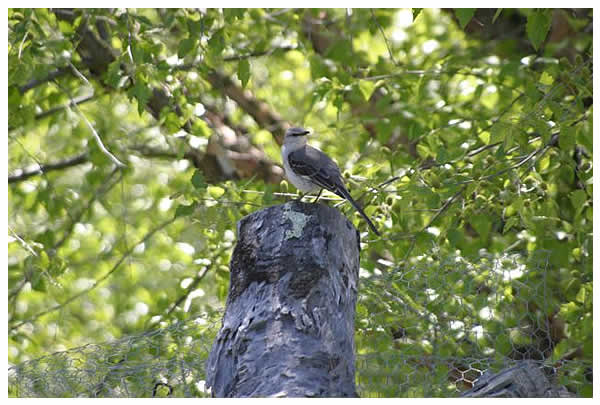
A mockingbird investigates what's up, and
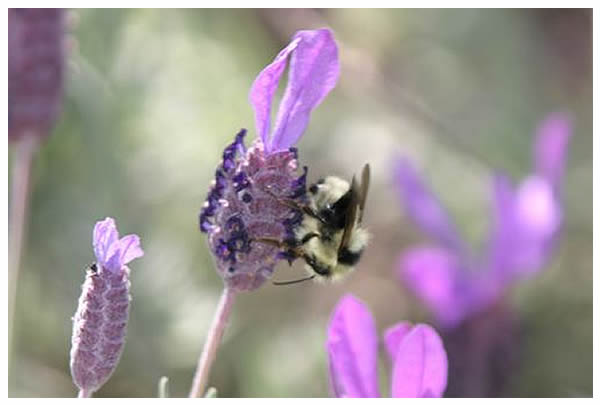 a
honeybee investigates some lavender blossoms!
a
honeybee investigates some lavender blossoms!
<back to top>
What's in the box this week
~~~~~~~~~~~~~~~~~~~~~~~~~~~~~~~~~~~~~~~~~~~~~~~~
(Content differences between Family and Small
Shares are underlined and italicized; items with a “+” in
Family Shares are more in quantity than in Small; anticipated quantities are
in parentheses. Sometimes the content of your share will differ from what's on
this list, but we do our best to give you an accurate projection. It's Mother
Nature that throws us the occasional curve ball!)
Family Share:
Arugula (bunched)
Red “Ace” beets
Me Quing Choi (3 to 4)
Broccoli (Lakeside)
New spring carrots!
Chard
Fava beans +
Fresh garlic
Lettuce (Lakeside/LEF) (2)
Onions
Spinach (Lakeside) bunched
Strawberries (2 bskts)
Small Share:
Arugula (bunched)
Red “Ace” beets
Me Quing Choi (2 to 3)
New spring carrots!
Fava beans
Fresh garlic
Lettuce (Lakeside/LEF) (1)
Spinach (Lakeside) bunched
Strawberries (1 bskt)
Extra Fruit Option:
(starts next week!!)
Notes from Debbie's Kitchen
~~~~~~~~~~~~~~~~~~~~~~~~~~~~~~~~~~~~~~~~~~~~~~~~
More pointers and more recipes! [Note: whenever
you see something in square brackets in the middle of someone else's
recipe, that's just me sticking in my two cents!] – Debbie
Veggie evolution
Ah, how I love to tell the passage of time by the way the veggies we
get in our boxes each week change. Up until now, we've been getting the
overwintered carrots, topped and bagged. This week, a new fresh batch
of tender spring carrots! Last week, the arugula was pretty small and
so it was bagged for you. It has since gotten bigger, and so this week's
arugula will be bunched. Last week our Wednesday members got small red
Russian kale in a bag; Thursday folks got bigger leaves, in a bunch.
My favorite I think is watching the evolution of the garlic though. It
starts out looking exactly like leeks (I heard from many of you who claimed
to have not gotten garlic, until I explained this part). But as the weeks
pass, the root end of your garlics start to form the bulb, then the bulb
gets bigger, then you'll notice the cloves starting to form, then the
cloves will be big enough you can peel and use them and the outer layers
will thin to a skin. Finally there will be a hiatus of garlic in our
shares, as the crop, now fully mature, will be harvested and laid out
to dry in the sun. Then at the appointed time in the fall, we'll start
getting garlic again, only it will be in the more familiar dry bulb
form.
When to eat fava pods whole, when to shell them
(and when to skin the beans inside)
Here’s my rule of thumb: while the pods are still nice and green and smooth,
and the beans inside are relatively small, eat ‘em pod and all (see recipe
ideas in database). Even if the beans inside are starting to looking big
enough to eat on their own, if the pods are still in good shape I’m cool
with eating the favas pods and all (but if you prefer to shell them, shell away;
it’s
up to you). Once the pods get big and kind of warty-looking (which they do!),
I’d
definitely shell ‘em.
In a similar vein, the question of whether to peel the beans inside is up to
you (and maybe depends on how you’re going to use them). I skin ‘em
or not kind of according to my mood. If they’re really big, I generally
peel them, but if they’re small, I often don’t bother. If you’re
going to be using them whole in a pasta dish or soup or something, it’s
six one way half-dozen the other. If you’re going to be making a puree
or spread though, you’ll want to skin them first. It’s a texture
and a taste thing (as well as an appearance thing). Try it both ways and see
what you like best! The skinned beans are a prettier bright green, versus the
skin-still-on beans, which are a paler green.
Freezing fresh fava beans
If you’d like to save your fava beans for later use, you can freeze them.
Here’s what I’d recommend: first shell the beans, then blanch them
in boiling water for about 2 minutes (maybe 3 minutes if they’re really
big) – “big” to me means about the size of the last joint of
my thumb; “small” about
the size of the last joint of my pinky finger. Immediately immerse in cold or
ice water to stop the cooking. When completely cooled, peel if you wish (very
easy; just pinch one edge of the skin to create an opening and squirt ‘em
out) then blot dry on paper or cotton dish toweling. Spread prepared beans out
on a sheet of waxed paper on a rimmed baking pan and freeze. Once frozen solid,
decant to a ziploc bag, squeeze or suck out as much air as you can, seal and
return to freezer. That way you can pour out as many or few as you’d like
to use at a time.
Somebody asked, "why do you have to blanch them?" Here's what Joy of Cooking
says about that: "[Most] veggies should be blanched before freezing, for enzymes
continue to be active in vegetables even after harvesting and, unless arrested,
will bring about changes which lead to nutritional loss and off-flavors. Blanching
greatly lessens enzymatic activity and for this reason becomes an essential part
of the freezing procedure."
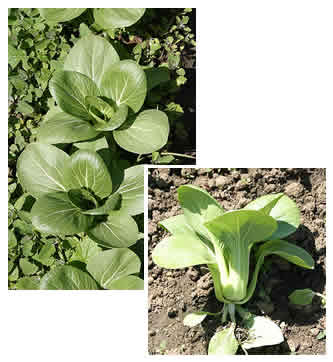 Mei Quing Choi
Mei Quing Choi looks very similar to bok choi, and here on the farm I think we’ve
tended to use the two names rather interchangeably; the only difference between
the two is that the stems of Mei Quing Choi are a little more slender and pale
green (similar to the leaves); Bok Choi (sometimes called Pak Choi) stems are
white, and the leaves a darker green. And although what we’re getting this
week is the Mei Quing Choi, the two can be used interchangeably in each others’ recipes!
Freezing Mei Quing or Bok Choi
Don’t do it. Like lettuce (which I wouldn’t freeze either!), chois
have a lot of water in the body of the stems, and so the cells will burst when
frozen and you’ll have mush when you go to thaw them. Just use ‘em
fresh!
Crystal City Pak Choi
from “More Recipes from a Kitchen Garden” by Renee Shepherd & Fran
Raboff [Debbie’s comments in brackets]
2 – 3 bunches Pak Choi
2 tbsp. olive oil
1 clove garlic, minced [or a goodly chunk of green garlic, chopped]
1 red onion, thinly sliced [or some fresh farm onion, sliced]
1 tsp. dry mustard
1 tbsp. soy sauce
1 tsp. rice vinegar
1 tbsp. sake or dry sherry
3 scallions, finely chopped [or the equivalent quantity of green tops from the
fresh farm onions]
2 tbsp. finely chopped parsley
salt and pepper to taste
2 tbsp. toasted sesame seeds, for garnish
Cut Pak choi stalks into 1-inch lengths. Shred green tops and reserve. In a large
skillet, heat oil, add garlic and onions and stir fry until softened. Stir in
Pak choi stalks, mustard, and soy sauce and stir fry until Pak choi is tender,
about 10 to 12 minutes [I would think less... maybe 5 minutes?]. Stir in shredded
tops, vinegar, sake or sherry, scallions, parsley, and salt and pepper to taste.
Cover and cook 2 more minutes. Garnish with toasted sesame seeds and serve immediately.
Swiss Chard with Balsamic Vinegar
from member Farrell Podgorsek
Farrell says, “omit the sausage to keep the dish vegetarian.”
1 stalk green garlic, thinly sliced
1 small onion or a couple of leeks, thinly sliced
1 bunch swiss chard, leaves removed from stems and roughly sliced (stalks saved
for another use)
1 small can diced tomatoes (or some fresh tomatoes, cut up, if it's summertime)
Balsamic vinegar - about 1/3 cup
oil to saute vegetables in
salt & pepper
Precooked sausage, sliced into rounds
Cooked Pasta -we used a large shape to hold the sauce
Heat oil in a saucepan. Add the onion and green garlic and saute until softened. Add
chard leaves and saute until they wilt somewhat. Add tomatoes with
their liquid, balsamic vinegar and salt & pepper. Cook, covered, stirring
occasionally, for about 10-15 minutes. Add sausage and heat through. If
the greens are a bit dry, add a couple of ladlesful of the pasta water.
Serve over pasta.
Beef and root vegetable stew
from member Mary Lyn Azar
[I put this one in because many of you still probably have beets and rutabagas
from prior weeks and are still looking for ideas.]
Since we got a number of root vegetables last week, I thought I'd share a recipe
I've been using a lot this winter. This comes from my sister-in-law's method
of cooking potatoes, carrots, onions, and stew beef but I've expanded it to include
whatever made sense from that week's box. This week, I took the rutabagas,
beets (both peeled and cut into chunks), half the carrots (washed well and cut
into 1/2 inch segments), and two of the green garlics (cut in half lengthwise
and sliced up to where the leaves split off). All of that goes into an
oven safe pot with a couple of tablespoons of vegetable oil, salt, and pepper
and is tossed. Then I put about a pound and a half of stew beef on the
top, drizzle on a bit more oil and a little more salt and pepper and put it in
the oven at 350 (beef still on top). When the beef browns, I flip it, when
it's browned on the other side I give the whole pot a good stir and then stir
it every 15-20 minutes until it is done (vegetables are easy to pierce with a
fork, roughly 1 1/2 hours total cooking time). Over the winter I've also
used winter squash, potatoes, and parsnips. When I don't have green garlic
I do half an onion and several cloves of garlic. The recipe is really flexible
and I use it with whatever I have available.
Braised Lettuce
from “Farmer John’s Cookbook; the real
dirt on vegetables”
serves 3 to 4
[Someone inquired in the Friends of LEF Yahoo group about 'what to do with all
that lettuce?' If you're not a salad person, give this a try!]
“Tired of munching on bunny food? Don’t be afraid to add heat to
lettuce. In this recipe, small heads of lettuce are blanched to tender succulence,
then braised to give them a buttery golden glow. Cooking lettuce this way brings
out a natural, delicate sweetness in the leaves. The bunnies don’t know
what they’re missing.” – shareholder from Angelic Organics
CSA (Farmer John’s farm)
3 to 4 small heads lettuce, rinsed whole under running water, tough or bruised
outer leaves removed
½ tsp. salt
1 to 2 tbsp. butter
freshly ground black pepper
1. Tie a piece of string around each head of lettuce, just tightly enough to
hold the leaves together and promote even cooking.
2. Bring 2 quarts of water to a boil; add the salt and reduce heat to a simmer.
Add the lettuce heads and boil for 3 minutes.
3. Drain the lettuces in a colander and let cool. When cool enough to handle,
gently squeeze them in your hands to remove any excess water. Remove the string.
4. Melt the butter in a large skillet over medium heat. Add the lettuce heads;
cook until lightly browned, about 3 minutes. Continue to cook, turning them carefully,
for another 3 minutes. Season with salt and pepper to taste. Serve immediately.
Onion or Scallion and Orange Salsa
also from “Farmer John’s Cookbook;
the real dirt on vegetables”
[I thought this sounded like a delicious and different
way to use the beautiful fresh onions in our shares (and also the cilantro, if
you, like me, still have some in your fridge from last week!)]
“Refreshing, juicy, and sweet, oranges are a delightful accompaniment to
crisp and pungent raw onions. This salsa is fantastic on anything grilled. It’s
also great as an addition to a salad plate, over lettuce, or over cottage cheese.
The milder scallion version is fantastic on lettuce or endive cups with a salty
and creamy cheese such as soft feta, chevre, or blue. For either version, you
can adjust the amount of chile pepper to suit your palate.” – Angelic Organics
Kitchen
½ C minced scallions or onions
2 large or 3-4 medium oranges, peeled, seeds removed, diced
2 tbsp. chopped fresh cilantro
1 ½ tbsp. finely chopped chile pepper (or more or less, to taste)
¼ tsp. ground cumin
1. Put the chopped scallion or onion in a strainer and run under cold water.
Drain well.
2. Stir all the ingredients in a medium bowl. Serve immediately or cover and
refrigerate for up to a day.
Lebanese beet salad with pomegranate molasses
from “The Ottoman Kitchen” by Sarah
Woodward
[I loved the sound of this recipe!]
8 small fresh uncooked beets in their skins
½ large or 1 small white onion, peeled and finely chopped
a large handful of fresh flat-leaf parsley, finely chopped [I bet you could substitute
finely chopped chard leaf or kale leaf for the parsley]
a small handful of fresh mint, finely chopped
1 fat clove of garlic, peeled and minced [or a big chunk of green garlic, very
finely minced]
1 tsp. sea salt
juice of 1 large lemon
1 tbsp. pomegranate molasses [available at middle-eastern markets; I’ve
also seen it available for sale at Casablanca’s Cafe in Willow Glen.
This is yummy stuff to have around!]
4 tbsp. extra-virgin olive oil
Steam beets about 45 minutes, until they are tender. As soon as they are cool
enough to handle, peel off and discard the skins. Dice the flesh and mix with
the chopped onion, herbs and garlic. Whisk the salt into the lemon, followed
by the molasses. Slowly whisk in the oil until you have a thick emulsion. Pour
this over the beets (it’s important to do this while the beets are hot,
so the flavors are absorbed) and let stand for several hours before serving.
<back to top>
Calendar of Events
~~~~~~~~~~~~~~~~~~~~~~~~~~~~~~~~~~~~~~~~~~~~~~~~
(see calendar on website for more info)
<> Fri. May 18, Four Fridays Mataganza Garden Internship (5/18, 5/25, 6/1,
6/8)
<>
Sat. Jun 9 Outstanding in the Field Dinner
<> Sat. Jun 23 Summer Solstice
Celebration
<> July 10-14 Teen Adventure Camp
<> Aug 24-26 Childrens Mini-Camp
<>
Sat. Oct 20 Fall Harvest Celebration
<back to top>
Contact Information
~~~~~~~~~~~~~~~~~~~~~~~~~~~
email the farm: farmers@cruzio.com
email Debbie with newsletter input or recipes: deb@writerguy.com
phone: 831.763.2448
web: http://www.liveearthfarm.net
~~~~~~~~~~~~~~~~~~~~~~~~~~~