|
What's in the box this week
~~~~~~~~~~~~~~~~~~~~~~~~~~~~~~~~~~~~~~~~~~~~~~~~
During the winter season there are no 'Family' or 'Small' sized shares - everybody gets the same size box! As usual though, content can sometimes differ
from this list (typically we will make a substitution), but we do our best to
give you an accurate projection.
[go to recipe database]
Winter Share
Fuji apples
Golden Beets (loose, topped)
Broccoli (Lakeside Organic Gardens)
Brussels sprouts
Red cabbage
Carrots (big bag Chantenays, topped)
Chard (2 bunches)
Fennel (Lakeside Organic Gardens)
Red Russian kale (2 bunches)
Leeks
Preserved apricot halves (LEF apricots, prepared by Happy Girl Kitchens)
Apricot jam (LEF apricots/Happy Girl Kitchens processing)
Bread Option
This week's loaf will be whole wheat with mixed seeds
|
The Joy of Farm Tools
~~~~~~~~~~~~~~~~~~~~~~~~~~~~~~~~~~~~~~~~~~~~~~~~  Today I woke up early to a bright silver moon, the skies have finally cleared and the landscape over the last few days, is bursting with color and life. Winter on the farm has come to an end, now we wait for the soil to dry and a chance to start anew. The greenhouse is filled with seedlings, the soil is covered by lush covercrops ready to be tilled back, to build and nourish the soil that grows our food. Today I woke up early to a bright silver moon, the skies have finally cleared and the landscape over the last few days, is bursting with color and life. Winter on the farm has come to an end, now we wait for the soil to dry and a chance to start anew. The greenhouse is filled with seedlings, the soil is covered by lush covercrops ready to be tilled back, to build and nourish the soil that grows our food.
In most parts of the world, draft animals are used for tilling the fields, the heaviest and probably physically most demanding job on the farm. I was born and raised in the city, and don't come from a family of farmers with the skills to care for, instruct, and work with draft animals. I rely on tractors and a range of mechanical tools and implements to till and cultivate the soil in our fields. I have to confess, although the tractor might be less romantic, since childhood I have had a fascination for tractors and farm equipment. I never I never  tire watching steel, shaped into knives, shovels, shanks and discs flowing through the soil cutting, slicing, digging, and shaping to create the right tilth. As you know from gardening, using the right tools can make all the difference in how well we care for and manage the soil into which we plant. tire watching steel, shaped into knives, shovels, shanks and discs flowing through the soil cutting, slicing, digging, and shaping to create the right tilth. As you know from gardening, using the right tools can make all the difference in how well we care for and manage the soil into which we plant.
Speaking of planting, every year we grow more than 40 different types of vegetables many of which are transplanted as seedlings into prepared fieldbeds. Crops such as Lettuce, Broccoli, Cauliflower, Cabbage, Summer Squash, Tomatoes, Cucumbers, Chard, Kale, Eggplants, Peppers are all sown in the greenhouse and grown out into strong seedlings, at which point they are transplanted into the field. Ever year we transplant 100's of thousands of seedlings, a time consuming and tiring task, requiring hours of bent over backs. So, after more than 14 years transplanting by hand,  I couldn't resist the opportunity to buy a used mechanical transplanter last week. The charm about a mechanical transplanter is that it is attached to the back of a tractor, straddling and riding over the beds to be planted into. A person instead of bending over, planting each seedling by hand, can now sit on a small chair, feeding the seedlings through a rotating hopper where they slide through a shoot directly into a small furrow opened by a steel shoe. Once the seedling is placed in the furrow it gets gently pressed into the soil by two wheels. Like most farm equipment I am always impressed by it's design for utility, one doesn't have to deal with lots of esoteric engineering facts to understand the simple working principles of most farm machines. I couldn't resist the opportunity to buy a used mechanical transplanter last week. The charm about a mechanical transplanter is that it is attached to the back of a tractor, straddling and riding over the beds to be planted into. A person instead of bending over, planting each seedling by hand, can now sit on a small chair, feeding the seedlings through a rotating hopper where they slide through a shoot directly into a small furrow opened by a steel shoe. Once the seedling is placed in the furrow it gets gently pressed into the soil by two wheels. Like most farm equipment I am always impressed by it's design for utility, one doesn't have to deal with lots of esoteric engineering facts to understand the simple working principles of most farm machines.
When I shared my enthusiasm about the newly acquired mechanical transplanter with my wife Constance and the farm interns their response was an understanding smile, as if they just saw Tom, the little boy, getting a new toy. Oh well, at my age some people like to buy themselves a slick sportscar, a mechanical transplanter may not be as sexy, but for me it ranks right up there, giving the same level of satisfaction.
|
|
Summer Celebration Date Change!!
~~~~~~~~~~~~~~~~~~~~~~~~~~~~~~~~~~~~~~~~~~~~~~~~
Hello everyone ~ well, our Solstice Celebration is once again scheduled on the Solstice - Saturday June 20th! It was originally going to be on the 27th this year, but both our musical groups were booked elsewhere on that day, so we're on for the 20th, and so Kuzanga [Kuzanga Marimba] and the Slugs [The Banana Slug String Band] will all be there to make it a special and wonderful day. Mark your calendars now ~ you won't want to miss this great event!
|
|
New Castroville pickup location
~~~~~~~~~~~~~~~~~~~~~~~~~~~~~~~~~~~~~~~~~~~~~~~~
For the upcoming season, we will be adding a new pickup location, in Castroville - right off of Hwy 1 in that little residential community formed by the intersection of 183 (Merritt St. in Castroville, or Castroville Rd. further out) and 156. If you would like to switch to picking up here, just email Debbie at the farm and she'll set you up! We have discontinued both Prunedale and Salinas, and those members have been notified, however we wanted everyone to know, in case this was more convenient for someone else we didn't know about!
|
|
Our website is NOT missing...
~~~~~~~~~~~~~~~~~~~~~~~~~~~~~~~~~~~~~~~~~~~~~~~~ If you have any old, saved links to our old website address, www.liveearthfarm.com, don't panic if you go to there and suddenly find nothing there. Just change your settings to go to www.liveearthfarm.net. We own the domain liveearthfarm.net, and the old .com domain, which was originally under different ownership (and used to have a redirect to .net), is expiring and we are in the process of re-securing it in the farm's name. This may take a month or two. In the meantime, please remember to look for us at liveearthfarm.net and you'll be all set!
|
|
Spring 'Healthy Cooking' class, to benefit our educational non-profit, the Live Earth Farm Discovery Program
~~~~~~~~~~~~~~~~~~~~~~~~~~~~~~~~~~~~~~~~~~~~~~~~ CSA member and nutrition consultant Karen Haralson and her co-instructor Rebecca Mastoris, a natural chef/nutrition consultant from Bauman College (a holistic nutrition school in Santa Cruz), will be donating their time to hold a fun and educational cooking class here on the farm! You will learn how to create delicious, healthy meals using the farm's spring produce (of the same type as what you will be getting in your CSA box)... AND benefit our new educational non-profit at the same time!
Karen says, "We will be preparing several wonderful dishes that we will share together in a feast when we're done - outside if the weather is nice! We will also be providing information on the nutritional value of these beautiful foods."
The class will meet in the barn kitchen at Live Earth Farm on Saturday, April 18th, 11am-3pm. Suggested donation is $25 - $35 (or more, if you're willing!). Please call or email Karen at 831.335.3245 ktese@cruzio.com to reserve your space. We can only handle a maximum of 25 people, so contact her early to assure your seat at the cutting board! ;-)
|
|
Remember...
~~~~~~~~~~~~~~~~~~~~~~~~~~~~~~~~~~~~~~~~~~~~~~~~ 3/11/09 --- this is the last winter share!
There will be a 2-week break, and then...
Weds/Thurs April 1st/2nd = 1st delivery week of the regular season!
|
Notes from Debbie's Kitchen
~~~~~~~~~~~~~~~~~~~~~~~~~~~~~~~~~~~~~~~~~~~~~~~~ Click here to go to recipe database.
Once again, here it is the last week of the Winter Share already... boy, that went by quickly! Fortunately, there will only be a two week break, and then the regular season begins the 1st week of April! This last box of the winter will be a big one, so if you play your cards right, you may be able to make it stretch...! Okay, on to recipes. - Debbie
Member Diana Wirt sent me these first two, both from allrecipes.com:
Beets in Orange Sauce
Serves 8 [but you could halve it easily]
8 medium beets [can be made with any color beets]
1/4 C sugar
2 tsp. cornstarch
Dash pepper
1 C orange juice
1 medium navel orange, sliced and halved (optional)
1/2 tsp. grated orange peel
Place beets in a large saucepan; cover with water. Bring to a boil. Reduce heat; cover and cook for 25-30 minutes or until tender. Drain and cool slightly. Peel and slice; place in a serving bowl and keep warm.
In a saucepan, combine the sugar, cornstarch and pepper; stir in orange juice until smooth. Bring to a boil; cook and stir for 2 minutes or until thickened. Remove from the heat. [I've made a similar orange sauce with butter, orange juice, and honey, and just simmered it until reduced and thickened. I'm sure that'd work here too. ~ Debbie]
Stir in orange slices, if desired, and peel.
Pour over beets. [Diana says she just laid the orange slices on top for a pretty presentation.]
Roasted Brussels Sprouts
Diana says about this recipe, "The reviews said that even Brussels sprouts-hating children like these... and I can attest that my Brussels sprouts-hating male friend likes them." [And as we all here in 'Debbie's Kitchen' are coming to learn - LOTS of veggies are really tasty when roasted!] [And I've modified this one a tiny bit ;-) Debbie]
1 ½ lbs. Brussels sprouts, ends trimmed and yellow leaves removed
3 tbsp. olive oil
1 tsp. kosher salt
1/2 tsp. freshly ground black pepper
Preheat oven to 400 degrees F. Place trimmed Brussels sprouts, olive oil, kosher salt, and pepper in a large re-sealable plastic bag. Seal tightly, and shake to coat [or as Diana, says, just toss them all together in a bowl - I agree with her.] Spread prepared sprouts on a rimmed baking sheet, and place in the oven on center oven rack.
Roast in preheated oven for 30 to 45 minutes, shaking pan every 5 to 7 minutes for even browning. Reduce heat when necessary to prevent burning. Brussels sprouts should be darkest brown, almost black, when done. [Remember the Ugly Green Beans recipe? Same concept.]
Adjust seasoning with kosher salt, if necessary. Serve immediately.
Comment from original recipe-writer on allrecipes.com: "This recipe is from my mother. It may sound strange, but these are really good and very easy to make. The Brussels sprouts should be brown with a bit of black on the outside when done. Any leftovers can be reheated or even just eaten cold from the fridge. I don't know how, but they taste sweet and salty at the same time!"
Debbie's oven-dried apples
This technique worked great to reduce my backlog of farm apples while simultaneously producing a great snack item! Start this process in the evening and you'll have dried apples by morning.
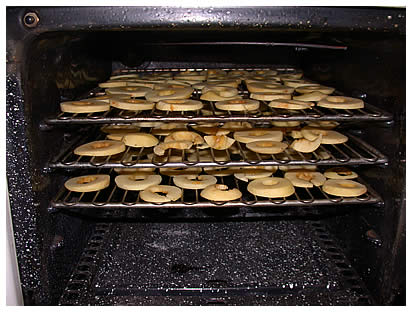
It's very simple! Preheat your oven to low (200 - 225 degrees).
Peel, core, and slice (somewhere btwn. ¼ and 1/8th inch slices - try to keep them more-or-less uniform) as many apples as you want. Spread them out directly on the racks of your oven (make sure they're clean). Bake them for about half an hour to 40 minutes (peek and see how they're doing), then turn off the heat and prop the door open with a pot-holder (so, just a little). Leave the apples in the oven overnight, and by morning you should have yourself a buncha dried apple slices!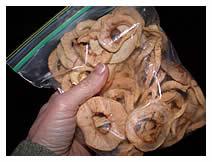
Remove and store in a ziplock bag (no need for refrigeration).
This next recipe is one I clipped out of a 2004 Whole Foods Magazine (I think they stuck the mag in my basket while shopping)...
Red Cabbage and Caramelized Fennel
Serves 8
1 ½ tbsp. fennel seeds
2 medium fennel, with tops
2 tbsp. olive oil
1 tsp. sea salt, plus to taste
6 C red cabbage, sliced into ¼-inch strips (about half a medium head)
¾ C water
2 tbsp. apple cider vinegar
1 tbsp. mirin
In a heavy saucepan over medium heat, toast fennel seeds until fragrant, about 2 minutes. Transfer seeds to a clean coffee mill; grind to a powder. Set aside.
Trim top and bottom of fennel; reserve fronds in a bowl of cold water for use later in the recipe. Core fennel; slice bulbs into ¼-inch slices.
In a deep, wide sauté pan over medium heat, warm the oil; add sliced fennel and salt. Sauté 10 minutes, or until fennel begins to caramelize [depending on how well caramelized you like it, this can take a lot longer... use your judgment]. Add the red cabbage, water and apple cider vinegar. Raise heat to high and bring to a quick boil. Cover, reduce heat to low, and cook 20 minutes. Uncover and stir in the mirin and ground toasted fennel seeds. Cook over high heat, stirring occasionally until liquid evaporates. Remove from heat.
Just before serving, roughly chop reserved fennel fronds; stir into cabbage mixture. Salt to taste. Serve warm or at room temperature.
Another fennel recipe!
Sage, fennel and Pernod pasta
from a SJ Mercury News clipping, attributed to "In Season: Cooking with Vegetables and Fruits" by Sara Raven
Serves 4
6 medium shallots
20 fresh sage leaves [this is where your herb garden comes in handy!]
3 medium or 2 large fennel bulbs
5 tbsp. Pernod (may substitute ouzo, sambuca or arak)
5 tbsp. water
3 tbsp. unsalted butter, melted
3 tbsp. olive oil
Salt
Freshly ground black pepper
8 oz. dried or fresh tagliatelle pasta (may substitute pappardelle or thin egg noodles)
¼ C pine nuts
Freshly grated Parmesan cheese, for garnish
Preheat oven to 475 degrees F.
Trim and peel the shallots, then coarsely chop them along with the sage leaves. Place the mixture in a Dutch oven or medium-sized, heavy-bottomed pot with a lid.
Discard the tough outer layers and cores of the fennel bulbs [our bulbs won't be that big, so you probably won't have to do this], reserving fronds for another use, if desired. Coarsely chop remaining fennel and add to Dutch oven or pot along with the Pernod, water, butter and oil. Season lightly with salt and pepper, stir to combine, then cover. Place in the oven to cook for 10 minutes. Check to make sure the fennel is not sticking; add Pernod or water as needed so the vegetables are well coated. Cover and cook for 15 more minutes.
During the last 15 minutes of cooking, bring a large pot of salted water to a boil over high heat. Add the pasta, cook according to package directions and drain, reserving 3 tbsp. of the pasta cooking water. Toast the pine nuts in a small dry skillet over medium heat for 3 to 4 minutes, shaking them a few times to keep them from burning [I like to toast them in my toaster oven in a little open-faced 'dish' I made out of aluminum foil and keep handy for just this purpose!]. Remove from heat.
Transfer the vegetables to a food processor along with any remaining liquid; pulse over the course of 15 seconds or just long enough to combine the ingredients as a sauce without pureeing them. Taste and adjust seasoning as needed.
Combine the pasta, sauce, cooking water and pine nuts in a large serving bowl. Sprinkle with Parmesan cheese; serve hot.
Brussels Sprouts [Red Cabbage and Apple] Sauté
from 'Carried Away', a small cafe take-out spot in Aptos
(out of a cookbook about the Great Chefs of Santa Cruz)
serves 6
1 lb. Brussels sprouts, a few outer leaves removed
1 C red cabbage, roughly sliced
1 small yellow onion, sliced
2 tart apples, peeled, cored and sliced
¼ C olive oil or vegetable oil
red wine vinegar to taste (about 2 tbsp.)
salt and pepper
Heat olive oil in a sturdy, non-corrosive sauté pan until quite hot but not smoking. Put the Brussels sprouts in and cook at medium to high heat, stirring frequently, for about 10 minutes or until sprouts are brown on all sides and are starting to cook on the inside.
Add sliced cabbage and onion to the sprouts. Reduce heat to medium and cook for another 5 minutes.
Add sliced apples, vinegar, salt and pepper. Cook until all ingredients are tender. Adjust for seasoning of vinegar, salt and pepper.
Roasted Broccoli with Raisin Vinaigrette
from Bon Appetit, Feb 2008 [modified slightly]
Serves 4
"The tangy-sweet vinaigrette brings out broccoli's deep flavor in the best way." [Notice that here's yet another recipe with yummy roasted veggies! What'd I tell you?]
1 ½ lbs. broccoli, stems removed, tops cut into large florets [if you have big stems, peel them and cut them into chunks; don't chuck 'em!]
6 tbsp. olive oil, divided
2 tbsp. Sherry wine vinegar
½ C raisins
1 tbsp. water
½ tsp. ground cumin
Preheat oven to 400 degrees F. Put broccoli in a bowl and toss with 3 tbsp. of the olive oil, sprinkle with salt and pepper, maybe toss again [Bon Appetit says to do this on the baking sheet, but I like doing the tossing in a bowl so it doesn't go everywhere! ;-)] then spread on a large rimmed baking sheet. Roast broccoli until tender and brown in spots, about 25 minutes.
Meanwhile, combine the other 3 tbsps. olive oil, the vinegar, raisins, water and cumin in a blender. Blend until raisins are finely chopped, about 30 seconds. Season vinaigrette to taste with salt and pepper.
Transfer roasted broccoli to a large bowl, add vinaigrette and toss to coat [see, they do it in a bowl here!!]. Serve warm or at room temperature.
Lastly... more and more people are starting to ask me about how I make my beet kvass, so I thought since we're getting plenty of beets again this week, this would be a good time to expound on it further. I'll end with this.
Debbie's beet kvass
Update
4/11/09: I'm experimenting further with kvass-making, to try to get
more effervesence instead of a 'still' beverage. I'm thinking now
that sealing a lid on (rather than the coffee filter, described below)
may cause the gases from fermentation to be re-dissolved back into
the kvass... that's my theory anyway. I'll update this again with
the results of my testing! Meanwhile, the techniques I describe below
will give you a 'still' kvass (no fizz). Perhaps this closing of
the lid will shorten the ferment time, as so many recipes say to
leave it out only 2 days? Seems too short to me, but again, I'll
let you know what I find out! :-) - Debbie
I've been making beet kvass for a while now (it's a fermented beverage,
a sour-salty, sometimes slightly fizzy 'tonic' I have a small glass
of before breakfast and in the evening before dinner) and LOVE it.
However, Sally
Fallon's recipe for Beet Kvass in her cookbook "Nourishing Traditions" in
my opinion does not allow nearly enough time for the kvass to ferment
and develop that great sour flavor I so crave. She says to leave
it out a mere 2 days; I leave it out for 7 or more (if I have the
patience) -- the longer you let it ferment, the sourer it will get
(to a point).
Beet kvass can be made with any color of beet. The flavor varies somewhat with different types of beet (all the more fun to experiment!), but one of my favorites is a combination of part red, part golden beet (chiogga beets also make a delicious, electric-pink kvass!). Anyway, here's how I make kvass these days:
for a 1 gallon jar ~ (yes you can halve the recipe, but I don't have enough to last me the week if I do that!)
<> 5 or so medium beets, peeled and diced (the more beets, the
more concentrated the flavor)
<> 2 tbsp. coarse grey sea salt (get the good stuff! don't use
table salt; it has anti-caking agents and other junk in there you
don't want)
<> ½ C whey (this is the hardest part - see note below on how to get)
<> distilled or filtered water (not tap; has chlorine in it which
kills the beneficial bacteria you want to encourage!)
Place diced beets in the bottom of a gallon jar. Dissolve salt in a cup with some water in it (I just use my 2-cup measure, but anything will do, you just want to dissolve the salt). Combine that and the whey with the beets in the jar, then fill with filtered/distilled water and stir well. Cover with a cloth or something to keep flies out (I use a coffee filter and a rubber band), then set in your kitchen somewhere and let it sit for a week. I like to label it with the date so I remember how long it's been fermenting.
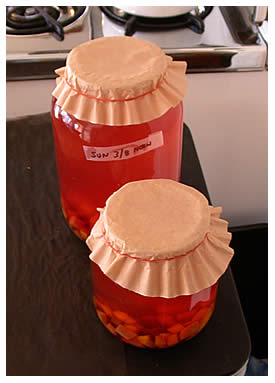 Sometimes partway through the week I'll pop off the coffee filter and check on it. Often you will get a layer of mold or scum (Sandor Katz, my fermentation guru, likes to call it a 'bloom') on top, but this is harmless; just carefully scrape it or scoop it out/wipe the rim however you can (again, I use a coffee filter to kind of scoot it underneath and scoop it out, then wipe the rim as needed). If a little bit of it stays behind, it won't hurt you. It's just an aesthetic thing. I also sometimes stir the jar, as the kvass is more concentrated down at the bottom, where the beets are. This distributes it more evenly. Sometimes partway through the week I'll pop off the coffee filter and check on it. Often you will get a layer of mold or scum (Sandor Katz, my fermentation guru, likes to call it a 'bloom') on top, but this is harmless; just carefully scrape it or scoop it out/wipe the rim however you can (again, I use a coffee filter to kind of scoot it underneath and scoop it out, then wipe the rim as needed). If a little bit of it stays behind, it won't hurt you. It's just an aesthetic thing. I also sometimes stir the jar, as the kvass is more concentrated down at the bottom, where the beets are. This distributes it more evenly.
Also sometimes some of the golden beets (for some reason!) have a tendency to float up to the top. Haven't figured out how to stop them from doing this, but am trying cutting them into slightly bigger dice.
Anyway, after 7 days, taste a little (I'll use a turkey baster to suck some out and squirt into a glass) and see what you think. If it is sour to your liking, decant it into a pitcher, store in the fridge, and make another batch (you can make a second batch from the same set of beets... it tends to be weaker, of course, but it's up to you). If you don't make a second batch from the beets, I'd leave them in the jar or pitcher with the kvass in the fridge, so it'll continue (albeit slowly) to ferment and sour more. Yum!
Warning... this stuff gets addicting! ;-) [No, it is NOT an
alcoholic beverage.]
Note on whey: To get ahold of whey, you can try contacting Lynn (Summer Meadows Farm, if you do her goat share program) and getting some from her - it lasts in the fridge a long time, or, you can make it yourself. Get a large container [a quart? no, it's 2 lbs.] of good, organic whole milk plain yogurt, such as from Strauss Creamery (available at Trader Joe's). Line a large mesh colander with 2 layers of fine cheesecloth, or maybe a clean cotton or linen handkerchief (single layer), set the colander over a bowl or non-reactive pan, and dump the yogurt in. Let this sit 24 hrs. or so in your fridge, and the whey will slowly drip out. I sometimes flip the yogurt halfway through the process. What you end up with is the whey, which you can decant to a jar and store in the fridge for a good month, and some really thick, fabulous yogurt which separates nicely from the cheesecloth in a lump and can be used like creme fraiche. That'll also keep a couple weeks easy. Can't beat that with a stick!!
|
|
2009 CALENDAR
~~~~~~~~~~~~~~~~~~~~~~~~~~~~~~~~~~~~~~~~~~~~~~~~
Here is the current schedule, and we will update the calendar here in the newsletter regularly. You can also get more information from the calendar on our website.
NEW!! Farm Workshops/Lectures
this is an idea that is still forming...
Possible subjects to include Permaculture, Fermented Foods, Farming with
the Wild... stay tuned!
NEW!! Community Farm Days
Every 4th Saturday of the month from May through October, 9am - 4pm
Participants are welcome to arrive Friday evening and camp out overnight
to Saturday. Please leave
your dogs at home, thanks! The intent of Community Farm Days is
to increase the opportunity for members and their families to experience and
enjoy a slice of "life
on the farm" at different times of the year - kind of like our old
Mini Camp, but for members of all ages! Each month will have a different activity
focus, and will be announced in advance here in the newsletter.
'Healthy Cooking' workshop
Saturday April 18th (see blurb above, this issue [Winter Week 8])
Apricot U-Pick Days
two Sundays: July 5th and July 12th
Bring your own bags.
Summer Solstice Celebration
Saturday June 20th <---note new date!
[click here for a short YouTube video of our 2007 celebration]
*** Children's Mini-Camp has been discontinued, and is being replaced with the above-mentioned Community Farm Days. ***
Fall Harvest Celebration
Saturday October 24th
[and click here for a YouTube video of our Fall celebration!]
|
|
