
~~~~~~~~~~~~~~~~~~~~~~~~~~~~~~~~~~~~~~~~~~~
Live Earth Farm (Com)Post
3rd Harvest Week, Winter 2006/2007
Dec. 13, 2006
~~~~~~~~~~~~~~~~~~~~~~~~~~~~~~~~~~~~~~~~~~~
In this issue
--Greetings from Farmer Tom
--The Art of Strawberry Mulching
--Michael Pollan: One Thing to Do about Food
--More pictures from around the farm
--What's in the box this week
--Notes from Debbie's Kitchen (or, Recipes... lots!!!!)
"Everything that grows holds perfection but a little
moment. "
~ William Shakespeare
Greetings from Farmer Tom
~~~~~~~~~~~~~~~~~~~~~~~~~~~~~~~~~~~~~~~~~~~~~~~~
 Farming is a journey, a dynamic process of discovery, where everything
is constantly changing and renewing itself. It is this dynamic that inspires
me to farm the same land season after season. The truth is, my inspiration
comes from interacting and absorbing the wisdom and balance I discover
in the seemingly infinite expressions of nature. The evening light illuminating
the freshly mulched field of strawberries next to a vibrant green and emerging
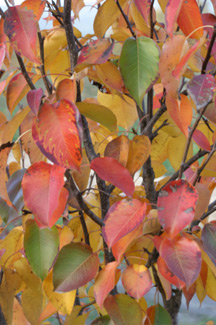
cover crop, or the Asian Pear trees standing aflame in bright red, yellow
and orange colors amidst the already bare and dormant Warren Pears, are
moments that will slow my pace and silence the chatter in my mind, so that
I may step out of the routine and experience the enchanting nature of this
land. Winter is a cherished time of year to slow down and celebrate this
wonderful party we call Life. We wish you a Happy New Year and a Peaceful
and Nourishing Holiday Season.
Farming is a journey, a dynamic process of discovery, where everything
is constantly changing and renewing itself. It is this dynamic that inspires
me to farm the same land season after season. The truth is, my inspiration
comes from interacting and absorbing the wisdom and balance I discover
in the seemingly infinite expressions of nature. The evening light illuminating
the freshly mulched field of strawberries next to a vibrant green and emerging
cover crop, or the Asian Pear trees standing aflame in bright red, yellow
and orange colors amidst the already bare and dormant Warren Pears, are
moments that will slow my pace and silence the chatter in my mind, so that
I may step out of the routine and experience the enchanting nature of this
land. Winter is a cherished time of year to slow down and celebrate this
wonderful party we call Life. We wish you a Happy New Year and a Peaceful
and Nourishing Holiday Season.<back to top>
The Art of Strawberry Mulching
~~~~~~~~~~~~~~~~~~~~~~~~~~~~~~~~~~~~~~~~~~~~~~~~
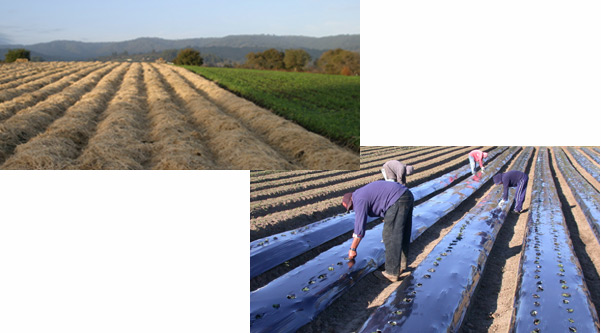 In order to ensure an abundance of plump red sweet strawberries in the spring it is critical that after planting them they are mulched, hence the name STRAWberries. It is very easy for organically grown berries to become infested with weeds, however, and strawberries are a crop where most mechanical and/or hand-weeding methods are very difficult. In order to achieve a reasonable yield of healthy and clean fruit over the course of one season, the only economical mulching method available is to stretch a thin film of agricultural plastic 'mulch' over the freshly planted strawberries, and then cut out a small hole for the plants to poke through. The drawback in using plastic mulch is that it must be removed and disposed of every season, together with the 'drip tape' irrigation hoses which are buried in the beds between the plants. Fortunately, in recent years several companies have offered to recycle this agricultural plastic, however it still makes for a lot of waste. So this year, on a reduced acreage, we are testing out the use of rice straw (left over from our straw bale castle) as mulch, so as to evaluate whether it could be a viable alternative to plastic for parts of our yearly production.
<back to top>
One Thing to Do about Food
~~~~~~~~~~~~~~~~~~~~~~~~~~~~~~~~~~~~~~~~~~~~~~~~
by Michael Pollan
Reprinted with permission from Michael Pollan; originally written for the Sept. 11, 2006 issue of The Nation, and also appeared in the Fall 2006 issue of Ag Matters, the quarterly newsletter of the National Campaign for Sustainable Agriculture (NCSA)
I first read this article in Ag Matters, and felt that our CSA membership would appreciate a little enlightenment on the US farm bill. - Debbie
Every five years or so the President of the United States signs an obscure piece of legislation that determines what happens on a couple of hundred million acres of private land in America, what sort of food Americans eat (and how much it costs) and, as a result, the health of our population. In a nation consecrated to the idea of private property and free enterprise, you would not think any piece of legislation could have such far-reaching effects, especially one about which so few of us--even the most politically aware--know anything. But in fact the American food system is a game played according to a precise set of rules that are written by the federal government with virtually no input from anyone beyond a handful of farm-state legislators. Nothing could do more to reform America's food system--and by doing so improve the condition of America's environment and public health--than if the rest of us were suddenly to weigh in.
The farm bill determines what our kids eat for lunch in school every day. Right now, the school lunch program is designed not around the goal of children's health but to help dispose of surplus agricultural commodities, especially cheap feedlot beef and dairy products, both high in fat.
The farm bill writes the regulatory rules governing the production of meat in this country, determining whether the meat we eat comes from sprawling, brutal, polluting factory farms and the big four meatpackers (which control 80 percent of the market) or from local farms.
Most important, the farm bill determines what crops the government will support--and in turn what kinds of foods will be plentiful and cheap. Today that means, by and large, corn and soybeans. These two crops are the building blocks of the fast-food nation: A McDonald's meal (and most of the processed food in your supermarket) consists of clever arrangements of corn and soybeans--the corn providing the added sugars, the soy providing the added fat, and both providing the feed for the animals. These crop subsidies (which are designed to encourage overproduction rather than to help farmers by supporting prices) are the reason that the cheapest calories in an American supermarket are precisely the unhealthiest. An American shopping for food on a budget soon discovers that a dollar buys hundreds more calories in the snack food or soda aisle than it does in the produce section. Why? Because the farm bill supports the growing of corn but not the growing of fresh carrots. In the midst of a national epidemic of diabetes and obesity our government is, in effect, subsidizing the production of high-fructose corn syrup.
This absurdity would not persist if more voters realized that the farm bill is not a parochial piece of legislation concerning only the interests of farmers. Today, because so few of us realize we have a dog in this fight, our legislators feel free to leave deliberations over the farm bill to the farm states, very often trading away their votes on agricultural policy for votes on issues that matter more to their constituents. But what could matter more than the health of our children and the health of our land?
Perhaps the problem begins with the fact that this legislation is commonly called "the farm bill"--how many people these days even know a farmer or care about agriculture? Yet we all eat. So perhaps that's where we should start, now that the debate over the 2007 farm bill is about to be joined. This time around let's call it "the food bill" and put our legislators on notice that this is about us and we're paying attention.
<back to top>
More pictures from around the farm
~~~~~~~~~~~~~~~~~~~~~~~~~~~~~~~~~~~~~~~~~~~~~~~~
Field of young garlic, with cauliflower and chard at far left: 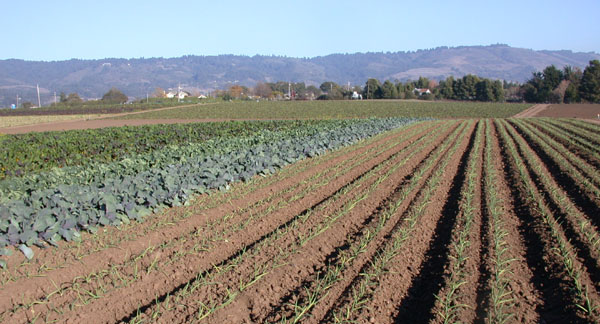
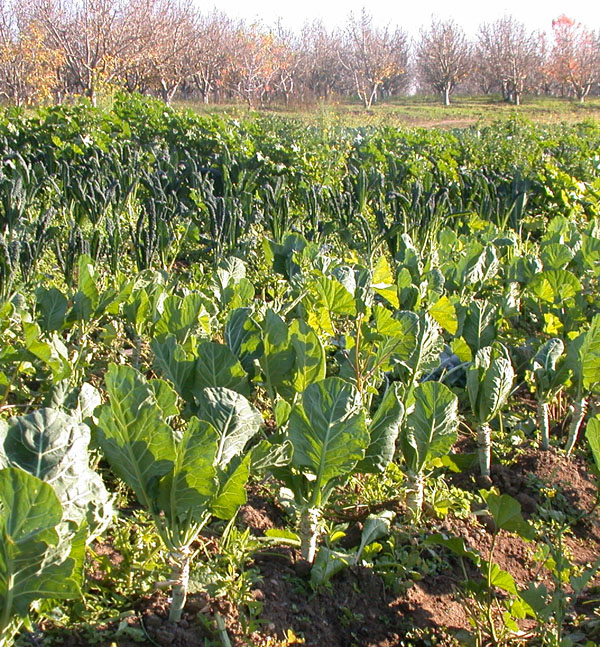
Field
of partially harvested collard greens and Lacinato kale with Warren pear
trees in the background (observe how collards are harvested: leaves are
snapped off of the side of the stalk as the plant continues to grow upward.
Collards and kale are both harvested this way):
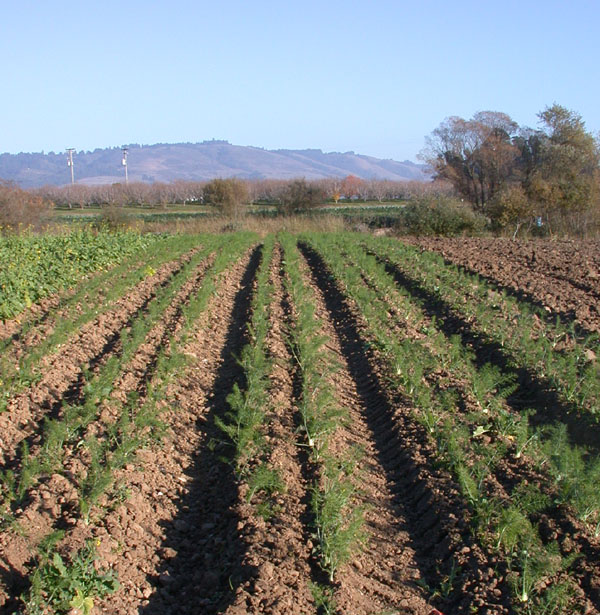
Field of fennel:
<back to top>
What's in the box
~~~~~~~~~~~~~~~~~~~~~~~~~~~~~~~~~~~~~~~~~~~~~~~~
1 celeriac (from Lakeside)
1 head white cauliflower (from Lakeside or LEF)
1 bunch red beets
1 bunch golden beets
1 bunch carrots
2 delicata squash
2 butternut squash
1 bunch red Russian kale
2 bunches chard
6 green cooking apples (Mutsu) (from Billy Bob's orchard)
8 eating apples (combination of Fujis and Braeburns) (from Billy Bob's orchard)
2 to 3 avocados (from Marsalisi Farms)
<back to top>
Notes from Debbie's Kitchen
~~~~~~~~~~~~~~~~~~~~~~~~~~~~~~~~~~~~~~~~~~~~~~~~
Well, this is our last hurrah before the end of the year. After this week's box we'll all have a three week break over Christmas and New Year's. Next box isn't until January 10th, so I thought I'd just give y'all a BUNCH of recipes to last you. ;-) Everybody take care and I'll talk to you in 2007!!! - Debbie
This first recipe was submitted by member Amoreena Lucero, who says, "I increased the sage as others [other readers on the Gourmet Magazine website] recommended and it was fantastic!"
Butternut Squash with Shallots and Sage
from Gourmet magazine, serves 4
2 tablespoons olive oil
3 shallots, halved lengthwise, then cut crosswise into 1/4-inch-thick slices (3/4 cup)
1 (1 3/4-lb) butternut squash, peeled, halved lengthwise, seeded, and cut into
1/2-inch cubes (4 cups)
1/2 cup reduced-sodium chicken broth or water
1 tablespoon packed brown sugar
1/2 teaspoon finely chopped fresh sage
1/2 teaspoon salt
1 teaspoon balsamic vinegar
1/4 teaspoon black pepper
Heat oil in a 12-inch heavy skillet over moderate heat until hot but not smoking, then cook shallots and squash, stirring, until shallots are softened, about 5 minutes.
Add broth, brown sugar, sage, and salt, stirring until sugar is dissolved. Simmer, covered, stirring occasionally, until squash is tender, 8 to 10 minutes. Remove from heat and stir in vinegar, pepper, and salt to taste.
This next one was submitted by member Odile Wolf. She said it was from a friend of hers in northern Germany. "I used the 3 bunches of kale we got with the [first week's] winter share. It is very good," says Odile.
Kale and Sausages
5 lbs. kale, washed and chopped
2 onions, peeled and diced
schmaltz (rendered chicken or goose fat) or coconut oil
3 to 5 sausages - like bratwurst or similar
salt pepper nutmeg
Saute onions in schmaltz or coconut oil until transluscent. Add kale, a handful at a time, along with a splash of water. Once kale has shrunk to fit the pot, add the sausages and let it all cook for up to an hour. Then add the salt, pepper and nutmeg. if you can find a piece of smoked hoghack to add, it will be even better. We eat this with cooked potatoes, it's really satisfying when it is really cold outside.
Here's a recipe I got off of the Mountain Harvest Organic website Mountain Harvest is a CSA farm in North Carolina; I met the farmer at a local farmers market in NC when I was at a family reunion there last summer. Thought this recipe sounded neat!
Butternut Apple Crisp Bars
Mountain Harvest Organic Farm
3 C peeled and sliced butternut squash
3 C peeled and sliced tart apples
1 C packed brown sugar
1/8 tsp. ground cloves
1 tsp. ground cinnamon
2 tsp. lemon juice
1 1/4 C all purpose flour
1/2 tsp. salt
6 tbsp. softened butter
1/3 C chopped nuts
(ice cream, optional!)
Preheat oven to 350 degrees. In a large mixing bowl, mix squash and apple slices with 1/2 C brown sugar, cloves, cinnamon and lemon juice, tossing to mix. Place in a well-greased shallow baking pan and bake for 30 minutes. Remove from oven.
In a medium mixing bowl, combine remaining brown sugar, flour, salt and butter until crumbly. Add nuts. Spread evenly over squash/apple mix. Bake 40 minutes longer. Cut into bars. May be topped with ice cream.
Celeriac Info
 I have compiled the following info from a pastiche of cookbooks and online resources, as I have never personally cooked with it before! (As you know, that doesn't slow me down one bit.) Although there were plenty of recipes out there, it was hard as heck to find any info about the use (or not!) of the stalks attached to the root; all the recipes were only for the root! But I finally found a bit of info... from another CSA farm's website, naturally! (Waltham Fields Community Farm, in Massachusetts.) Here's my distillation:
 A relative of both celery and parsley, celeriac (also known as celery root) comes from a slightly different variety of celery than the one raised for its stalks. It has the flavor of celery and the texture of a turnip. It has a pretty gnarly appearance (see photo) that may put some people off, but I know our staunch winter CSA members are not 'some people' ! And here, from Waltham Fields Community Farm, the info on the stalks: "Celeriac's leaves and stalks are edible and can be used to flavor soup stocks, but use sparingly as they are more potent than common celery. The leaves can also be thinly sliced and used in place of celery leaves or parsley."
I have read different estimates of how long the root will keep. Most folks indicate it will store up to several weeks in a plastic bag in your refrigerator (and even months if you have a root cellar... I dream of having a root cellar!). As per my usual mantra, you should separate the stalks from the root and store them separately. Although I didn't read that anywhere, my spidey sense (and experience) tells me that stalks which are left attached to an edible root will eventually draw moisture and nutrients from the root, making it rubbery. I know this is so with carrots and beets, and so I am guessing it will apply here too.
Celeriac can be used both raw and cooked; only thing to note about preparation is that, like apples, when the cut flesh is exposed to air, it will start to turn brown, so a lot of recipes call for dropping cut pieces into acidulated water (basically water with lemon juice in it, in proportions of juice of one lemon to about 4 C water).
Most cookbooks will say the usual, about combining it with other winter root veggies in stews and gratins, or cooking them with potatoes and mashing them. But here are a couple of recipes I thought would really get you started!
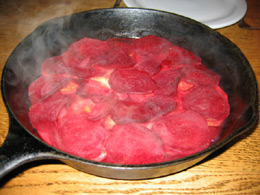 Beet-celeriac bake
 From "Seasonal Recipes from Greenfields" Greenfields Farm being an organic farm in Ontario, Canada! Recipe posted by (member?) Johanna [Johanna posted a beautiful photo of this recipe, which I have respectfully 'borrowed' to post here.]
3-4 large beets
1 large celeriac
1/2 cup orange juice
1/2 cup stock
Thinly slice beets and celeriac. Alternate layers of beet and celeriac (celeriac on bottom, then beet, then celeriac, then beet again). Pour over orange juice and stock. Cover and put in preheated 350 degree oven for 20 minutes. Uncover and increase heat to 425 degrees, bake another 10 minutes.
And here are two similar salads, the first also from the Greenfields website, the second from the cookbook "Farmer John's Cookbook the real dirt on vegetables." Thought I'd run them both, so you can see similarities and differences, and use them as fuel to 'cook up' your own combination!
Celeriac, Carrot and Apple Salad
(also by Johanna, from Greenfield's see above)
1 small celeriac
2-3 large carrots
2 small apples
1/4 C mayonnaise
1/4 C sour cream
3 tbsp. lemon juice
salt, pepper to taste
Peel and grate celeriac, apples and carrots. Toss with lemon juice. Mix together sour cream, mayonnaise, salt and pepper, toss with salad.
Celeriac and Apple Salad with Tarragon and Roasted Walnuts
from Farmer John's Cookbook (Angelic Organics Kitchen)
Serves 4 - 6
I love the opening blurb from this recipe, so I'm going to transcribe it here: "It probably isn't often that you think ooooh, celeriac, and your mouth waters. But this recipe could change all that. Crisp celeriac is combined with sliced apple and roasted walnuts, producing delightful results in both texture and taste. The key here is to be sure to cut the celeriac to matchstick-size, no bigger; it will hold the sauce better. Also, don't be tempted to skimp on the pepper, as pepper and apples have a certain unexplored appeal that will surprise you."
4 C water
juice of 1 lemon (about 3 tbsp.)
2 tart apples, peeled, cored, sliced into 1/4" strips
1 large celeriac, peeled, cut into matchstick-sized strips
1/2 C chopped walnuts
1 1/2 tbsp. white wine vinegar
2 1/2 tbsp. mayonnaise
1 tbsp. heavy cream
2 tsp. prepared Dijon mustard
1/2 tsp. dried tarragon
1/2 tsp. freshly ground black pepper
salt
Combine water and lemon juice in a large bowl. Add the apple slices and celeriac strips and let stand for 15 minutes (this acidulated water will keep the celeriac and apple from turning brown).
Toast the walnuts in a dry skillet over high heat, stirring frequently, until they begin to darken in spots, 3 to 5 minutes. Let cool. [I like to toast my nuts in my toaster oven; I make a small 'pan' from aluminum foil, with edges crimped up to contain the nuts, then toast them for a few minutes. You gotta watch them the first time until you learn how quickly the nuts toast in your own toaster oven. In mine, when I put frozen walnuts (I store my nuts in my freezer) into a cold toaster oven then 'toast' for about 4 minutes... that seems to do the trick.]
Drain the celeriac and apple mixture; return to the bowl, add the vinegar, and toss.
Combine mayonnaise, cream, mustard, tarragon, pepper, and salt to taste in a small bowl. Pour the dressing over the celeraic and apple mixture; toss to coat. Add the walnuts and toss again. Chill for at least 1 hour before serving (2 or 3 hours is even better).
Debbie's Apple Pie
Since we're getting a bunch of tart baking apples in the box this week, I thought I'd give you my old pie standby. This is long, but that's only because I'm describing how I really make it, not just listing ingredients and steps. ;-) I learned not to be afraid of making pies (some people have pie crust phobia), because I've always made what my mom called a 'stir-and-roll' crust. I think she got it originally from Joy of Cooking, and I have evolved it over the years (the original recipe called for plain milk and white flour; I love to use buttermilk and mix in part whole wheat flour). [My recipe card is brown and crumbling, written in my immature, teenager handwriting, with scribbles and edits over the decades!]
crust ingredients (for a 10" pie plate, top and bottom crust):
1 C whole wheat flour
2 C white flour
1 1/2 tsp. salt
1/2 C plus 2 tbsp. buttermilk (I've also successfully used plain yogurt)*
¾ C plus 2 tbsp. canola oil*
*measured in the same cup, the total liquid volume comes to 1 1/2 C
pie ingredients:
7 to 8 large, tart apples (the green Mutsu apples should be good for pie)
juice of 1/2 to one lemon, optional (i.e. for if you don't have tart apples)
1/4 to 1/3 C sugar
oh, maybe 1/2 tsp cinnamon (I never measure, just shake a bunch into the sugar and mix it together!)
ditto, but less (1/4 tsp?), with some ground cloves and even a little allspice
about 2 tbsp. butter
To make crust: toss and combine flour(s) and salt in a medium bowl with a fork. Whisk together buttermilk and oil in the cup you measured it in. Pour into flour/salt mixture and stir to combine. Form into a ball and pull apart into two halves. Roll out half between two sheets of waxed paper until wider than the diameter of your pie plate by about an inch or more. Peel off one sheet of the waxed paper, and invert the bottom crust onto the pie plate (I always use a glass pie plate, by the way). Roll the other half of the dough between same two pieces of waxed paper and let rest while you prepare the filing.
Preheat oven to 425 degrees. Peel, core and slice apples (I like to use my food processor with the 4mm slicing blade 'cause it's quick, but it is just as easy and very satisfying when you have the time to simply slice the apples right into the bottom crust!). Combine sugar and spices in a separate cup of some sort. I like to layer the apples and sugar, rather than tossing together in a bowl, so I'll put about a third of the apples into the bottom crust, then sprinkle a third of the sugar mixture over that, then dot with a little butter, then apples, then sugar, then dot with a little more butter, etc., until I can't stack the apples any higher! (Oh, and if you're using the lemon juice, just squeeze the juice from a lemon over the apples as you layer them in.)
Now go back to your top crust and peel off the top sheet of waxed paper, and cut a decorative design into the crust; the openings act as vents for the steam to escape. I traditionally make a 'sand dollar' design, with the vents extending radially out from the middle like the spokes of a wheel, but not connected at the center: four larger slits, with four smaller slits between the large ones. Once that's done, carefully invert the crust over the top of your apple pile, doing your best to make it land on center! Then tuck the overlapping top crust under the edge of the bottom crust and crimp (I use my thumb and first and second fingers to seal it into a fluted edge). Optionally at this point, you may sprinkle additional cinnamon sugar mixture lightly over the crust, mostly the crimped part.
To protect the perimeter of the pie crust from burning, make a shield out of strips of aluminum foil (I take a long-ish piece off the roll, fold it lengthwise, unfold it and then tear it in half it tears neatly along the crease then fold these halves in half lengthwise and wrap them around the edge of the pie plate, overlapping the ends, and gently folding it in over the crust edge and crimping it below the rim of the glass pie plate so it stays in place).
Place pie in the middle of your oven and bake at 425 degrees for about 18 minutes, then lower temperature to 350 degrees and bake an additional 35 minutes or so, up to 40 minutes, but not too long, as you don't want the apples to get all mushy, just to cook down and get tender.
Note: the top crust will remain a high and lofty shell even though the apples cook down. This looks cool!
Here is a 'short and sweet' thing to do with apples:
Fried Apples
tart apples
butter
Although these are more or less 'sautéed' apples, I've always called 'em 'fried apples'! Quarter apples, core, then cut into slices, leaving skin attached. Melt butter in a skillet over medium heat, then lay the apple slices down in a single layer over the melted butter. Do not stir. Let cook for 5 minutes or so, or until you see that the edges are starting to brown and the fruit turns from opaque to kind of translucent. With a spatula, carefully turn apple slices over and brown on the other side.
Fried apples are great as a side dish with pork or lamb chops, or with sausages! (If you're a vegetarian, like my friend Kirsten McGlynn... Kirsten use your vegetarian sausage!)
And one last recipe...
Grilled Beet Packets with Balsamic Vinegar and Walnuts
Serves 2 (also from the Waltham Fields Community Farm website)
The writer, Liz, says, "I discovered this simple way to prepare beets recently and have become addicted. Instead of grilling you could roast the beets in the oven. This recipe is from The Vegetarian Grill by Andrea Chesman."
4 medium beets (approx 3/4 lb.)
2 tbsp. chopped walnuts
1/2 tbsp. extra virgin olive oil
1 tsp. balsamic vinegar
salt and pepper
Cut beets into 1/2 inch slices. Put beets and walnuts on large piece of foil. Drizzle with the oil and vinegar and sprinkle with salt and pepper. Seal the packets so no liquid or steam will escape. Grill the packets over medium hot grill for 20-25 minutes (baby beets will take about 15 minutes). Open packet and test with fork for doneness and then serve hot. [Since it is winter here and you may not have access to your grill, I'd suggest a medium-hot oven, say, 400 to 425 degrees]
<back to top>
Contact Information
~~~~~~~~~~~~~~~~~~~~~~~~~~~
email: farmers@cruzio.com
phone: 831.763.2448
web: http://www.liveearthfarm.net
~~~~~~~~~~~~~~~~~~~~~~~~~~~